An overview of articles
OpenBao versus Vault (Enterprise)
OpenBao (A fork of HashiCorp Vault before HashiCorp changed its license to be less-open-source) is developing quickly, so this article may be outdated in a few weeks. It’s now November 2025, please keep that in mind.
Feature comparison
There are differences between OpenBao and Vault (and Vault Enterprise). Let’s compare. I’ll explain details below this table.
| Feature |
OpenBao |
Vault |
Vault Enterprise |
| Namespaces |
✅ |
❌ |
✅ |
| High Availability |
✅ |
✅ |
✅ |
| Auto unsealing |
✅ |
✅ |
✅ |
| Replication |
❌ |
❌ |
✅ |
| Performance standby |
❌ |
❌ |
✅ |
| Auto Snapshot |
❌ |
❌ |
✅ |
| Sentinel |
❌ |
❌ |
✅ |
In general, you can clearly see that OpenBao is a fork of Vault (Community/Open Source) and lacks some “enterprise” features.
Namespaces
Namespaces can be used to offer teams their own piece of OpenBao or Vault. They are administratively separated.
Note: Vault Enterprise offers namespaces, but offering these namespaces to teams introduces a risk for Vault Enterprise only: The “client count” can grow uncontrollably. Since OpenBao does not have the concept of “client-count”, this issue is not applicable to OpenBao.
High Availability
When using (the default and recommended) storage backend “Raft”, high availability is available on OpenBao, Vault, and Vault Enterprise. In general, Raft works really well; the only consideration to keep in mind is that the latency between nodes should be 8ms or less. That’s typically easy to achieve in a single datacenter.
Auto unsealing
OpenBao/Vault will start up in a sealed state. That means the backend where data is stored is encrypted and requires to be unsealed to make the data readable. By default, the “Shamir” method is used to unseal, which is a manual process. Especially in containers, this proves to be difficult to manage; if a pod spins up, it’s sealed and requires manual intervention to be unsealed and available. For this reason, auto-unsealing can help. There are several methods:
| Method |
OpenBao |
Vault |
Vault Enterprise |
| Shamir |
✅ |
✅ |
✅ |
| Cloud key |
✅ |
✅ |
✅ |
| HSM |
✅ |
❌ |
✅ |
| Transit |
✅ |
✅ |
✅ |
| Static |
✅ |
❌ |
❌ |
Note: The “Static” unseal method is nice for development purposes, but not for production use; the unseal key is stored on the node that runs OpenBao, which makes it quite insecure. Great for development though!
Replication
Vault Enterprise supports “replication”. There are two possibilities to use replication:
- Disaster Recovery replication (DR): One Vault Enterprise cluster synchronizes data to another (standby/dr) Vault Enterprise cluster. The other (standby/dr) Vault Enterprise cluster receives data and can be promoted to become a primary in case of a disaster. This promotion is a manual action.
- Performance Replication (PR): One Vault Enterprise cluster synchronizes data to another Vault Enterprise cluster. Both clusters are available for requests. This is typically used to lower the amount of time it takes to request a secret to Vault Enterprise. Typically, PR clusters are spread over the globe.
OpenBao is missing this replication feature. There are some workarounds that can be used to restore service in a disaster:
- Save a snapshot frequently and store it off-site. In a disaster scenario, the remaining infrastructure can be used to spin up (or maybe it was already spun up) an OpenBao cluster and restore the snapshot. This method may sound a bit simplistic. I would, however, recommend considering this very-simple-to-maintain method.
- Use PostgreSQL as a storage backend for Vault. In this scenario, you move the responsibility to synchronize data to PostgreSQL. The PostgreSQL environment that supports synchronization has quite a few moving parts, making it a bit more difficult to implement. I would recommend this pattern if your company/team is capable of delivering such a PostgreSQL environment.
- Spread a cluster over datacenters, having one datacenter with “voters” and one datacenter with “non-voters”. In case the datacenter with the voters is lost, the data is replicated to the non-voter datacenter. With a couple of commands, this non-voter cluster can be changed to a voter-cluster again. There is a limitation of less than 8ms latency between the datacenters.
Note: There is a lot of work planned to support replication.
OpenBao/Vault using Raft have a “leader”-“follower” concept. With OpenBao and Vault (non-enterprise), followers will forward any request to the leader. With Vault Enterprise, a follower can be told to answer read-requests. This makes Vault Enterprise a bit more scalable. There is an issue to implement this on OpenBao.
Note: Writes will always be dealt with by the leader. So the amount of scalability will depend on your workload. Typically, there are more reads than writes.
Auto Snapshot
Making a “snapshot” (A file containing a backup) is an authenticated call. Which makes scripting this a bit annoying. Vault Enterprise has a concept of “auto-snapshot”, where Vault Enterprise is configured to drop a snapshot to a destination and clean up old snapshots.
This is quite a convenient feature, although scripting this is certainly possible. Keep in mind that auto-snapshot cleans up old snapshots according to its configuration. This clean-up has to be configured differently; for example, on S3 a lifecycle policy can be set up.
Note: This snapshot is only applicable to Raft.
Sentinel
Sentinel is a “pre-policy-engine”. It can check for certain conditions before even attempting to fetch (or write) a secret.
Regular policies are mostly sufficient to limit access, but there are edge-cases where Sentinel proves valuable.
I’ve implemented Sentinel a few times for customers and always struggled with the non-intuitive and very product-specific configuration.
OpenBao can use CEL for this. Here too, it’s quite specific and not particularly easy, but it exists.
All versions of Vault support “audit-devices”. These are destinations to store audit logs. Typically “file”, “syslog”, or “socket” are used. OpenBao has an extra type: “http”.
| Device type |
OpenBao |
Vault |
Vault Enterprise |
| file |
✅ |
✅ |
✅ |
| syslog |
✅ |
✅ |
✅ |
| socket |
✅ |
✅ |
✅ |
| http |
✅ |
❌ |
❌ |
Besides the extra “http” type, OpenBao has an extra method to configure the audit device: in the configuration file. This sounds trivial, but it’s quite important. It means all requests, from the very first request, are audited. With Vault, any request done before the audit device is configured is not logged.
| Product |
method(s) |
| OpenBao |
Configuration file AND API calls |
| Vault |
API calls |
OpenBao is sponsored by GitLab. GitLab would like to include a better secrets manager in their GitLab product. Since the HashiCorp Vault license does not allow redistributing Vault in another product, GitLab has invested in the OpenBao project. I just got (November 2025) information that OpenBao will likely be included in GitLab at the beginning of 2026.
Self init is a feature where OpenBao will configure secrets engines, authentication engines, and policies on first launch.
Now that sounds like a small feature, but just as the audit-device difference in OpenBao, it’s quite important. It means no root-token is required anymore; you configure OpenBao to connect to, for example, LDAP and allow certain people to administer OpenBao.
The issue with the root-token is:
- It’s “god-mode”, very powerful.
- It’s anonymous. The audit logs will never tell you WHO has used the root-token.
So with self-init, administrators can log in personally, making it much more traceable who did what. In combination with the audit devices in a configuration file, this closes the gaps that Vault potentially has with anonymous logins and with missed audit lines.
Migration paths
This is the simplest migration. You can (either):
- Replace the
vault binary for openbao. This scenario keeps the data as Vault wrote it and lets OpenBao read the data.
- Make a snapshot from Vault (Community/OSS) and restore that snapshot on OpenBao. This allows you to try the migration before touching production.
Vault Enterprise to OpenBao
This migration proves more difficult. The structure that Vault Enterprise (actually Raft) stores data is incompatible with both Vault (Community/OSS) and OpenBao.
Happily I work for Adfinis where we support many OpenBao/Vault/Vault Enterprise environments and have tooling available to migrate from Vault Enterprise to OpenBao.
Conclusion
OpenBao is pretty capable, in some areas more capable than Vault. I’m expecting OpenBoa to be developed further and cover missing functionality soon.
Openbao highly available (HA) clusters
This article focuses around the design of an Openbao (or Vault) Raft cluster. There is always some doubt when setting up an Openbao cluster using Raft. These are some designs, with a focus to the amount of datacenters that are available.
Note: Openboa is under development, these suggestions are relevant in September 2025. Features for replication are changing rapidly however.
On prem
On prem, maybe using VMWare or so, allows you to run Openbao on your own infrastructure.
Single datacenter
In case a single datacenter is available, your options are limited. This is the design I would recommend.
+--------------------- DC 1 ----------------------+
|            +--- load balancer ---+              |
|            |                     |              |
|            +---------------------+              |
|                                                 |
| +--- bao-1 ---+ +--- bao-2 ---+ +--- bao-3 ---+ |
| |             | |             | |             | |
| +-------------+ +-------------+ +-------------+ |
+-------------------------------------------------+
In the ASCII-ART diagram above, you’ll find:
- A load balancer, this can be an F5 LTM, HAProxy, whatever. The load balancer is configured with a health-check to determine what node is the leader.
- 3 Openbao nodes, boa-[1-3]. Any (single) one of those nodes will be the leader, the rest follwers. Only leaders can serve traffic as of now.
Note: When possible, place the 3 bao nodes in different “availability zones”, where network, cooling and power are unrelated to another zone.
Double datacenter
There are some more options here, but still quite some limitations. This is what I would recommend:
                                              +--- DNS ---+
                         +--------------------|           |
                         |                    +-----------+
                         V
+--------------------- DC 1 ----------------------+   +--------------------- DC 2 ----------------------+
|            +--- load balancer ---+              |   |            +--- load balancer ---+              |
|            |                     |              |   |            |                     |              |
|            +---------------------+              |   |            +---------------------+              |
|                                                 |   |                                                 |
| +--- bao-1 ---+ +--- bao-2 ---+ +--- bao-3 ---+ |   | +--- bao-1 ---+ +--- bao-2 ---+ +--- bao-3 ---+ |
| |             | |             | |             | |   | |    OFF      | |    OFF      | |    OFF      | |
| +-------------+ +-------------+ +-------------+ |   | +-------------+ +-------------+ +-------------+ |
+-------------------------------------------------+   +-------------------------------------------------+
Here you see two datacenters, each with a unique Openboa cluster. They don’t synchronize data, as this feature is not available at this moment.
The intent is to let some DNS routing mechanism (F5 GTM or AWS Route 53 with health-checks for example) determine what cluster is available. The cluster on DC 1 is up and running, the cluster on DC 2 is installed, but not initialized. So the health check for the DC 2 cluster will not return an HTTP status of 200.
In case of an disaster, a stored snapshot should be restored to the DC 2 cluster. This is manual labour however.
Triple (or more) datacenter
In case you have 3 datacenters, you can create a cluster as following. Keep in mind the latency between the datacenters needs to be less than 8 ms.
                    +--- load balancer ---+
                    |                     |
                    +---------------------+

+----- DC 1 ------+   +----- DC 2 ------+   +----- DC 3 ------+
| +--- bao-1 ---+ |   | +--- bao-2 ---+ |   | +--- bao-3 ---+ |
| |             | |   | |             | |   | |             | |
| +-------------+ |   | +-------------+ |   | +-------------+ |
+-----------------+   +-----------------+   +-----------------+
Note: The load balancer is not placed in a DC, it should not be impacted by a disaster. This can be a DNS record as well, or a VIP.
Note: DNS based routing techniques can be slower to populate, as DNS records have an “time to live”. The time to live can be short however.
Alternative
You can move the storage backend to (for example) PostgreSQL. This means quorum is no longer important for Openbao. (PostgreSQL is responsible for getting the data from on data center to the other.
Future
I’m sure Openbao will introduce new features to allow for replication and multi datacenter setups, which would dramatically change the above advices.
FAQ
How many nodes should be in a HA Openbao cluster?
| amount |
effect |
| 1 |
No redundancy, loss of a node is loss of data and service. |
| 2 |
No quorum when a node is lost. This setup is more fragile than 1 node. |
| 3 |
Yes, quorum, finally. You can loose 1 node. |
| 4 |
You can loose 1 node, just as the 3-node setup, no benefit. |
| 5 |
Nice, you have a majority and can loose 2 nodes. Better than 3 nodes. |
| more |
When it’s uneven: fine. |
Note: Nodes should be spread over availability zones. A hyper scaler typically has 3 availability zones.
A typical setup of Openbao has 1 or 3 nodes. I would recommend 3. Sometimes I see a 5 node cluster where there are 3 availability zones, which makes no sense; losing an availability zone has the same effect as a 3 node cluster.
Ansible Python version chart
Ansible (ansible-core) depends on Python. Actually, the version of ansible-core has a strict requirements on the version of Python required.
Here is a table demonstrating the versions of ansible-core and their Python requirement.
Overview
| anisble-core |
python |
| 2.11.* |
>= 2.7, < 3.0 |
| 2.12., 2.13. |
>= 3.8 |
| 2.14., 2.15. |
>= 3.9 |
| 2.16., 2.17. |
>= 3.10 |
As you can see, Ansible version 2.12 was the first version of ansible-core to require python version 3.
TOX
The tool “tox” can be used to test multiple versions of pip modules in an exising Python installation. This is useful locally, to test if a certain python version and ansible version pass tests, or in CI to do these tests automatically.
Here is an example of a tox.ini configuration file.
[tox]

# Make a list of environments to test. This is a combination of python version and ansible version.
# Be aware, TOX does not install Python, the host that TOX runs on must have the required Python version(s) installed.
# A missing python version will result in a `SKIP`.
envlist =
    python2.7-ansible-2.11
    python3.8-ansible-2.12, python3.8-ansible-2.13
    python3.9-ansible-2.14, python3.9-ansible-2.15
    python3.10-ansible-2.16, python3.10-ansible-2.17

# These setting apply for all environments, listed further down.
[testenv]
commands = molecule test

# Some environment variables that are passed to the test environment.
# These variables are used by molecule, which allows you to run:
# $ image=ubuntu tag=latest molecule test.
# The DOCKER_HOST is set because I run docker on a remote host.
passenv =
    namespace
    image
    tag
    DOCKER_HOST

# Set some environment variables for the test environment.
# The TOX_ENVNAME is used to make molecule display a hostname, including the environment name.
setenv =
    TOX_ENVNAME={envname}

# The environments specified above, under the `envlist` section, should now define the Python version and the Ansible version.
[testenv:python2.7-ansible-2.11]
basepython = python2.7
deps =
    # Pickup the pip requirements from the requirements.txt file.
    -rrequirements.txt
    # Set a specific version of ansible-core.
    ansible-core == 2.11.*

[testenv:python3.8-ansible-2.12]
basepython = python3.8
deps =
    -rrequirements.txt
    ansible-core == 2.12.*

[testenv:python3.8-ansible-2.13]
basepython = python3.8
deps =
    -rrequirements.txt
    ansible-core == 2.13.*

[testenv:python3.9-ansible-2.14]
basepython = python3.9
deps =
    -rrequirements.txt
    ansible-core == 2.14.*

[testenv:python3.9-ansible-2.15]
basepython = python3.9
deps =
    -rrequirements.txt
    ansible-core == 2.15.*

[testenv:python3.10-ansible-2.16]
basepython = python3.10
deps =
    ansible-core == 2.16.*
    -rrequirements.txt

[testenv:python3.10-ansible-2.17]
basepython = python3.10
deps =
    ansible-core == 2.17.*
    -rrequirements.txt
The above configuration (tox.ini) works with a requirements.txt:
molecule
molecule-plugins[docker]
ansible-lint
Good luck testing!
Event Driven Ansible
Okay, so RedHat has released Event Driven Ansible. It’s a new way to execute playbooks, based on events.
These events originate from sources, a couple to highlight:
- Kafka: If a certain message is found on the bus, execute a playbook.
- Webhook: If a certain URL (on the Ansible Automation Platform Event Driven Ansible node) is called, execute a playbook.
This feels like a new way to remediate issues in an environment, for example: If a monitoring system detects a situation, call Ansible to remediate.
I’ve worked at companies that did “self healing” as a core-business, my conclusion so far.
If something is broken, there is a problem with the design. For example:
- If a disk is full, you may want to clean-up/compress data. The actual solution would be to add more storage.
- If a service stops unexpectedly, you may want to restart it. The actual problem is that the software needs to be fixed or the configuration needs to be improved.
Anyway, even with the above in mind, here is how Event Driven Ansible works.
+--- event source ---+   +--- event driven ansible ---+   +--- ansible controller ---+
| Kafka              | > | Rulebook                   | > | Playbook                 |
+--------------------+   +----------------------------+   +--------------------------+
Now Ansible Automation Platform has the Ansible Controller, on the right in the diagram above. AAP has an API already, so it feels somewhat redundant to have Event Driven Ansible. But. A difference is that Event Driven Ansible can react to something.
Use-cases I can think of:
- A change starts, Event Driven Ansible can put a node in maintenance mode.
- An issue occurs, Event Driven Ansible collects information about a node. This means the engineer in charge can start troubleshooting with the latest information.
- A deployment of a new node is done, Event Driven Ansible can configure the node. (Drawback; it becomes quite unpredictable when the node is ready, as this happens asynchronously from the deployment.)
- A node is removed, Event Driven Ansible can remove the node from monitoring/backup/etc.
I’m looking forward to see where Event Driven Ansible will go to in the future, it’s at least a new way to interact with Ansible.
If you have ever installed Tower or Ansible Automation Platform, you may know that it’s pretty specific. Here are my suggested improvements to the installer.
1. Output is cluttered
The output of the installer does not use loop_control.label causing the output to look something like this:
TASK [ansible.automation_platform_installer.repo_management : Install the Automation Platform bundle repository] ***
changed: [myaap-1.example.com] => {"changed": true, "checksum": "180eafb0ddf80e87f464c359358238a8aed1374b", "dest": "/etc/yum.repos.d/ansible-automation-platform.repo", "gid": 0, "group": "root", "md5sum": "36032c7104c2c8bfa11093eae71f54cb", "mode": "0644", "owner": "root", "secontext": "system_u:object_r:system_conf_t:s0", "size": 268, "src": "/root/.ansible/tmp/ansible-tmp-1718028961.09427-63855-258049482086701/source", "state": "file", "uid": 0}
changed: [myaap-0.example.com] => {"changed": true, "checksum": "180eafb0ddf80e87f464c359358238a8aed1374b", "dest": "/etc/yum.repos.d/ansible-automation-platform.repo", "gid": 0, "group": "root", "md5sum": "36032c7104c2c8bfa11093eae71f54cb", "mode": "0644", "owner": "root", "secontext": "system_u:object_r:system_conf_t:s0", "size": 268, "src": "/root/.ansible/tmp/ansible-tmp-1718028961.074965-63853-127923363074838/source", "state": "file", "uid": 0}
changed: [myaap-database.example.com] => {"changed": true, "checksum": "180eafb0ddf80e87f464c359358238a8aed1374b", "dest": "/etc/yum.repos.d/ansible-automation-platform.repo", "gid": 0, "group": "root", "md5sum": "36032c7104c2c8bfa11093eae71f54cb", "mode": "0644", "owner": "root", "secontext": "system_u:object_r:system_conf_t:s0", "size": 268, "src": "/root/.ansible/tmp/ansible-tmp-1718028961.0822551-63852-33509642687031/source", "state": "file", "uid": 0}
changed: [myaap-2.example.com] => {"changed": true, "checksum": "180eafb0ddf80e87f464c359358238a8aed1374b", "dest": "/etc/yum.repos.d/ansible-automation-platform.repo", "gid": 0, "group": "root", "md5sum": "36032c7104c2c8bfa11093eae71f54cb", "mode": "0644", "owner": "root", "secontext": "system_u:object_r:system_conf_t:s0", "size": 268, "src": "/root/.ansible/tmp/ansible-tmp-1718028961.079015-63857-51597012965829/source", "state": "file", "uid": 0}
As a consumer of this installer, I do not need all the clutter.
2. Some tasks are allowed to fail
TASK [ansible.automation_platform_installer.config_dynamic : Check if node is registered with RHSM] ***
fatal: [myaap-0.example.com]: FAILED! => {"changed": true, "cmd": ["subscription-manager", "identity"], "delta": "0:00:01.056821", "end": "2024-06-10 14:12:26.504043", "msg": "non-zero return code", "rc": 1, "start": "2024-06-10 14:12:25.447222", "stderr": "This system is not yet registered. Try 'subscription-manager register --help' for more information.", "stderr_lines": ["This system is not yet registered. Try 'subscription-manager register --help' for more information."], "stdout": "", "stdout_lines": []}
...ignoring
This one can be solved by setting failed_when to false and using a when condition in a follow-up task.
Or this one:
TASK [ansible.automation_platform_installer.preflight : Preflight check - Read in controller version] ***
fatal: [myaap-1.example.com]: FAILED! => {"changed": false, "msg": "file not found: /var/lib/awx/.tower_version"}
...ignoring
This task should be preceded with a ansible.builtin.stat task and only attempt to run the described task when the file exists.
3. Command used too often
Some tasks use the ansible.builtin.command module, where a “real” Ansible module is available. For example:
TASK [ansible.automation_platform_installer.redis : Enable Redis module] *******
changed: [myaap-2.example.com] => {"changed": true, "cmd": ["dnf", "module", "-y", "enable", "redis:6"], "delta": "0:00:04.711806", "end": "2024-06-10 14:18:47.991515", "msg": "", "rc": 0, "start": "2024-06-10 14:18:43.279709", "stderr": "", "stderr_lines": [], "stdout": "Updating Subscription Management repositories.\nUnable to read consumer identity\n\nThis system is not registered with an entitlement server. You can use subscription-manager to register.\n\nLast metadata expiration check: 0:00:06 ago on Mon 10 Jun 2024 02:18:37 PM UTC.\nDependencies resolved.\n================================================================================\n Package           Architecture     Version             Repository         Size\n================================================================================\nEnabling module streams:\n redis                              6                                          \n\nTransaction Summary\n===================================================
Here the module community.general.dnf_config_manager could have been used, making the task idempotent.
There are likely some tasks that require ansible.builtin.command in which case changed_when can be used to assert if a change was done or not.
4. Inconsistent names are uses
Some tasks end with a period, some do not. Here is an example:
TASK [ansible.automation_platform_installer.repo_management : Remove legacy ansible-tower repository] ***
TASK [ansible.automation_platform_installer.repo_management : Install the Automation Platform yum repository.] ***
5. Invalid (inventory) configuration are possible.
The Ansible Automation Platform setup used an inventory to explain what the installer should do. There are many invalid configuration possible. This means the installer will start to configure the instances, but fail with an “abstract” error at some moments.
Conclusion
The installer of Ansible Automation Platform does work, there are many interesting patterns used, but there is also room for improvement. As this installer feels a bit like a show-case for Ansible, I do not like the fragility of this installer.
Molecule debugging
Using Molecule really helps to develop Ansible roles. (and collections.) But, when things don’t go as planned, it can be a little more challenging to understand what’s wrong.
When Molecule runs, you see the Ansible output, something like this:
TASK [ansible-role-auditd : Start and enable auditd] ***************************
fatal: [auditd-fedora-rawhide]: FAILED! => {"changed": false, "msg": "A dependency job for auditd.service failed. See 'journalctl -xe' for details.\n"}
Now what
There are a couple of options:
- You can login to the instance Molecule created. You need to let the instance exist by running
molecule test --destroy=never. Next you can run molecule login to jump into the instance Molecule was running against. You can now troubleshoot the instance.
- You can put Ansible in debug mode:
ANSIBLE_DEBUG=True molecule test.
- You can increase verbosity:
ANSIBLE_VERBOSITY=5 molecule test.
- You can put Ansible in diff mode:
DIFF_ALWAYS=True molecule test.
- You can leave Ansible created scripts:
ANSIBLE_KEEP_REMOTE_FILES=True molecule test. This allows you to inspect the scripts Ansible placed on the target.
In my case ANSIBLE_VERBOSIY is set to 5: ANSIBLE_VERBOSITY=5 molecule test:
TASK [ansible-role-auditd : Start and enable auditd] ***************************
task path: /Users/robertdb/Documents/github.com/robertdebock/ansible-role-auditd/tasks/main.yml:44
Running ansible.legacy.service

...

fatal: [auditd-fedora-rawhide]: FAILED! => {
    "changed": false,
    "invocation": {
        "module_args": {
            "arguments": "",
            "enabled": true,
            "name": "auditd",
            "pattern": null,
            "runlevel": "default",
            "sleep": null,
            "state": "started"
        }
    },
    "msg": "A dependency job for auditd.service failed. See 'journalctl -xe' for details.\n"
}

PLAY RECAP *********************************************************************
auditd-fedora-rawhide      : ok=42   changed=0    unreachable=0    failed=1    skipped=3    rescued=0    ignored=0
(Still no clue what’s wrong by the way, but at least I see more of what Ansible is trying to do.)
Hope this helps you get unblocked with your Ansible/Molecule issue!
Code Organization
Context: I work in projects for customers. Mostly involving Ansible and Terraform. These customer range in size from about 100 employees to 100.000 employees.
Code organization?
After learning and adopting a technology, like Terraform on Ansible, a question that will come up is: “How do we structure all that code in a maintainable way?”. With this article I hope to explain what options there are and which option usually works.
NOTE: This is not exact science. This is my opinion and experience. I’m sure there are other ways to do this, with good reasons.
The organization types
I mostly see these types of organizations:
- “TECH ORIENTED” - There are departments like
network, linux, windows, databases and so on. Departments depend on each other, a database needs to be installed on for example linux, which needs to be on a network.
- “SERVICE ORIENTED” - There are departments based on business value, for example
mobile-app, morgages, parts-warehouse, it-support. These departments can be completely independent from each other, having their own release cycles and an outage to one service, does not affect the other services.
- “ENVIRONMENT ORIENTED” - Much less common, but there are
development, testing and production departments. Knowledge of all services is requied at eacht department. An “environment” can be broken, not influencing the other environments. (These departments can also be per datacenter, cloud or country for example.)
Decide
I’ve tried to draw (Yes, artschool does pay off.) a decision chart to help you decide which organization type to choose.
[ ]
]
The outcome contains a few of terms that need more explanation:
- “ONE REPO PER ENVIRONMENT” - Here, a single department maintains all code to provision and configure infrastructure. Typical for a smaller company with a couple of “system administrators”. In this situation, the blast-radius of a mistake can be huge.
- “MANY REPOS, ONE PER SERVICE, SHARING STATE” - This means that each service has it’s own repository, but they need something from each other. For example, the
network is shared, so as a department, you should connect to the currect subnets.
- “MANY REPOS, ONE PER SERVICE” - This means that each service has it’s own repository. This is a good way to go if you have a lot of services and they are not dependent on each other. This way you can have a release cycle per service.
My opinion
Hope this information helps a bit in deciding how to setup your repositories.
How I setup sandboxes
Context: I work in projects for customers. Mostly involving Ansible, Terraform, GitLab, Vault and Terraform Enterprise.
So here is a method I use to manage my work. It helped me over and over again in the last few years. This method does cost some time at the beginning of a project, but has saved me many hours later in the project.
At the start of a project I’ll keep my eyes and ears open to understand the environment I will be working in. These details include:
- What infrastructure (VMWare, AWS, GCP, Azure, etc.)
- What services relate to the thing I’m helping with. (LDAP, GitLab, OpenShift, etc)
- How is the network segregated.
- What issues are there at the moment.
I’ll mostly know what the deliverable is up-front. Sometimes it’s difficult to visualize what is expected anyway, that’s just something I’m not very good at. A deliverable can be something like:
- Upgrade the application.
- Scale up the application.
- Do a performance tests.
- Make a health-check report.
Note, that’s just an example, but it’s something along those lines.
Anyway, once I know what to do and know where to do it, I’ll start drawing. Images like this, quite abstract:
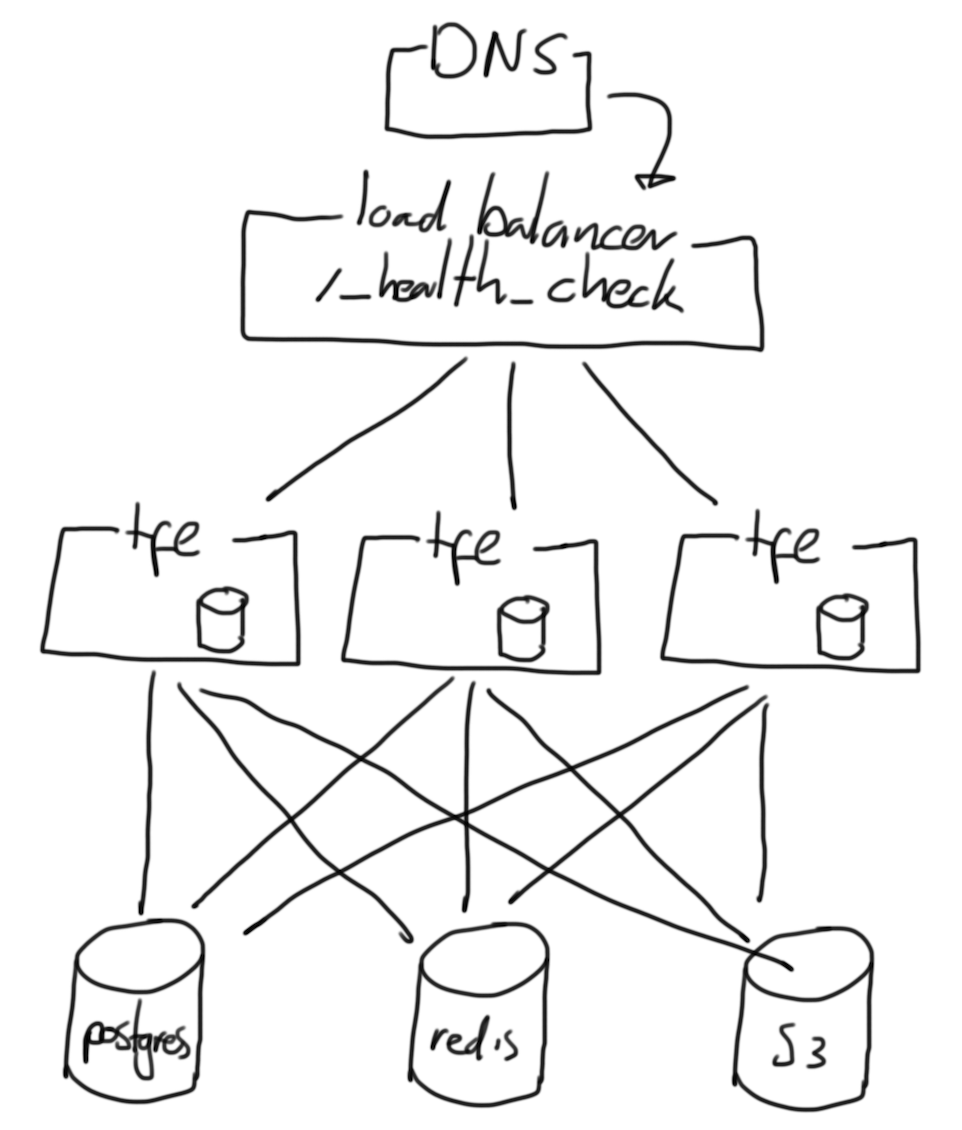
This imaging gives me a clue how to start coding. Coding I’ll mostly use Terraform to deploy infrastructure. It nearly always ends up with some instances, a load-balancer and everything required to support the application.
When using instances, It’s quite annoying that the IP/hostname keeps changing every deployment. So I’ll let Terraform write an ssh-configuration file.
First; I’ll include a conf.d directory from ~/.ssh/config:
(And just to be explicit, this is done manually, once, not by Terraform.)
Next I’ll let Terraform write an ssh configuration using a template (templates/ssh_config.tpl):
%{ for index, instance in instances ~}
Host instance-${ index }
  HostName ${ instance }
  User ec2-user
  IdentityFile ${ ssh_key_path }

%{ endfor }
In the above example; a loop is created using instances. The index is used to count in what loop we’re in.
Next, I’ll let Terraform place the ~/.ssh/conf.d/SOME_PROJECT.conf file:
# Place the SSH configuration.
resource "local_file" "ssh_config" {
  content = templatefile("${path.module}/templates/ssh_config.tpl", {
    ssh_key_path = local_sensitive_file.default.filename
    instances    = aws_instance.default[*].public_ip
  })
  filename = pathexpand("~/.ssh/config")
}
You see that both ssh_key_path and instances are sent to the template. And what’s missing here is all the code to make the instances and sensitive files. You’ll find many other articles describing that process.
Now if you terraform apply, Terraform will create instances and drop a .ssh config file, so you can simply type ssh instance-0. Also good for Ansible, because Ansible uses the .ssh configuration as well. So the inventory can simply contain the hostname instance-0. (And Terraform can create that inventory as well!)
What really helps here too, is to write modules/roles/libraries that can be re-used. This is an extremely time-consuming process, not always possible in a budget, but is a quick win for future projects. Such a next project would simply be an Ansible playbook for example that lists a couple of Ansible roles and variables. In some cases it’s difficult to justify the time-investment, but I always try.
Now comes the ethical part; What do customers actually pay for? My time? A deliverable? The truth is probaly somewhere in the middle. I work for Adfinis, so using the above pattern has a couple of advantages for both me/us and the customer or project:
- We’re reusing code that’s in use elsewhere. It probalby works, I don’t need to worry too much about the technicalities.
- It much quicker to build a production-like sandbox.
- It’s easier to collaborate; a colleague can also spin up a sandbox.
Anyway, hope this is useful to you, hope you get the benefits of this method, just as I do!
Ansible lookup or conditionals
There are multiple ways to how Ansible deals with differences in distributions. Take these 2 examples:
Here is an example that uses when to differentiate for different situations:
- name: Install packages
  ansible.builtin.package:
    - name: python3-docker
  when:
    - ansible_os_family == "Debian"
The example above installs python3-docker if the managed node is “Debian”. (ansible_os_family includes Debian, Ubuntu and others.
Another method is to make a map of distributions and define the required packages:
_my_packages:
  Debian:
    - python3-docker

my_packages: "{{ _my_packages[ansible_os_family] | default([]) }}"
Above you see the map _my_packages. It’s basically a variable that is a dictionary or map. In this case the intent is to map different operating systems to a list of packages.
The my_packages variable looks up a value from the _my_packages map. The results in:
python3-docker when the ansible_os_family is Debian.[] (an empty list) for any other ansible_os_family.
And just to complete the example: I prefer this method:
# vars/main.yml
_my_packages:
  default: []
  Debian:
    - python3-docker

my_packages: "{{ _my_packages[ansible_os_family] | default('default') }}"
# tasks/main.yml
- name: Install packages
  ansible.builtin.package:
    - name: "{{ my_packages }}"
As a maintainer of the above code, you can focus on the _my_packages map/dict. In my experience, this is simpler; Think of the logic once (tasks/main.yml or playbook.yml) and focus on “data” later. (vars/main.yml or anywhere else you’d put variables.)
By the way, I’m not sure how to call this mechanism, I guess “lookup” is pretty close.
Conclusion
You can use either of the above examples; I prefer the lookup method, but I see others using the conditional method more often.
The best argument for me is ease of maintentance or readability.
Ansible Cheat Sheet
Besides the many modules, there are actually not that many tricks to Ansible. I’m assuming you know a bit about Ansible and would like to explore the edges what can be done with Ansible.
Conditions
Conditionals determine when a task should run. You can check to see if something is in the state it should be before executing the task.
- name: Do something
  ansible.builtin.debug:
    msg: "I will run if some_variable is defined."
  when:
    - some_variable is defined
The task Do something will on run if some_variable is set. You can test many things.
Conditions can be applied to:
- Tasks
- Blocks
- Playlists
- Roles
Good to know: a when: statement accepts strings (when: "" == "hello') or can accept lists:
- name: Do something
  ansible.builtin.debug:
    msg: "I will run if some_variable is defined."
  when:
    - some_variable is defined
    - somm_variable ==  "hello"
Determining what makes a task changed or failed.
Sometimes Ansible needs some help determining what the result of a task is. For example the ansible.builtin.command module returns changed, because Ansible assumes you’ve modified the node. In these cases, you will need to tell Ansible when it’s changed. The same can be used to fail a task.
- name: Do something that does not change the system
  ansible.builtin.command:
    cmd: ls
  changed_when: no

- name: Do something and help Ansible determine when the task is changed
  ansible.builtin.command:
    cmd: some_command_that_can_change_things
  register: my_command
  changed_when:
    - '"modified" in my_command.stdout'
  failed_when:
    - '"error" in my_command.stdout'
The first example never changes, in this case, that’s true; ls is a read-only command.
The second example reports changed when modified can be found in the output. As you can see, you do need to use register to save the output of the command.
Ansible reports failed when error is found in the output.
Note: Ansible will fail by default if the cmd returns a non-0 exit code.
command, shell or raw.
Notify and handlers
Handlers are used to run after some task changed. It’s useful to “gather” handlers and run them at the end. A classic example:
tasks:
  - name: Place a configuration.
    ansible.builtin.template:
      src: some_config.conf.j2
      dest: /etc/some_config.conf
    notify:
      - Restart some_service

handlers:
  - name: Restart some_service
    ansible.builtin.service:
      name: some_service
      state: restarted
In the above snippet, the task places a configuration and informs the handler Restart some_service. This restart will occur at the end of a play.
There are some tricks:
It’s a list!
The notify argument takes a list:
- name: Do something
  ansible.builtin.command:
    cmd: ls
  notify:
    - First handler
    - Second handler
I like to spread things vertically, it improves readability.
Ordering
The order of the handlers is determined the order of the tasks as written in the handlers. Take this example:
handlers:
  - name: First
    # Something
  - name: Second
    # Something
  - name: Third
    # Something
Using the task in the handlers above, the order will always be:
FirstSecondThird
(And a handler can be skipped by not notifying it.)
Chaining
You can chain handlers. Sometimes this helps to get a role idempotent.
tasks:
  - name: Do the first thing
    ansible.builtin.command:
      cmd: ls
    notify:
      - Do the second thing

handlers:
  - name: Do the second thing
    ansible.builtin.command:
      cmd: ls
    notify:
      - Do the third thing

  - name: Do the third thing
    ansible.builtin.command:
      cmd: ls
You can create an not-so-infinite loop, by letting handler_one call handler_two and let handler_two call handler_one. This loops up to 3 times, not sure what prevents Ansible from an infinite loop, but thanks Ansible developers!
Conditions
You can add a condition to a handler, just like any other task.
- name: I am a handler
  ansible.builtin.command:
    cmd: ls
  when:
    - some_variable is defined
Running handlers now
If required, you can tell Ansible to run the handlers right now. You’d typically wait until the end of the play, but there are certainly situations where the handlers need to run right now.
tasks:
  - name: Do something
    ansible.command.command:
      cmd: ls
    notify:
      - Some handler

  - name: Flush the handlers
    ansible.builtin.meta: flush_handlers

  - name: Do other things
    ansible.command.command:
      cmd: ls

handlers:
  - name: Some handler
    ansible.command.command:
      cmd: ls
The order of the above tasks will be:
- Do something
- Flush the handlers
- Some handler
- Do other things
Delegating tasks
There are not many use-cases for delegate_to, but some will apply. Consider this snippet:
- name: Do something to the API
  ansible.builtin.uri:
    url: "https://some.host.name/api/v1/user
    method: GET
  delegate_to: localhost
The example above gets information from an API. There is no specific need to run this API call on the targeted node. In such cases, you can use delegate_to.
The examples I can think of:
- Using the
ansible.builtin.uri module.
- Copying files between nodes using the
ansible.posix.synchronize module.
Running a job just once
In some situations you want to do something to just one node from all targeted nodes.
tasks:
  - name: Do something
    ansible.builtin.command:
      cmd: ls
    run_once: yes
These situations may call for run_once, there are probably many more:
- Selecting a host that will become a cluster leader/master/primary.
- Checking if a variable is set correctly.
- Using
delegate_to to do something once locally.
- Managing a cluster that’s also created in the same role.
When writing Ansible roles, checking user input ensures your role can work. Imagine you are asking for a list, but a user specifies a boolean.
# This is a list.
my_variable_list:
  - one
  - two
  - three

# This is a string, not a list.
my_variable_list: hello
In the example above, the same varialbe is set twice (last one wins). The bottom one seems incorrect, as it’s not a list.
You can use at least two methods to verify if the input is correct; argument_specs or assert.
argument_specs
The documentation contains all details, but let’s take one example:
---

argument_specs:
  main:
    short_description: Install and configure Elasticsearch on your system.
    description: Install and configure Elasticsearch on your system.
    author: Robert de Bock
    options:
      elasticsearch_type:
        type: "str"
        default: oss
        description: "The license to use, `elastic` uses the \"Elastic\" license, `oss` uses the \"Apache 2.0\" license."
        choices:
          - elastic
          - oss
      elasticsearch_network_host:
        type: "str"
        default: "0.0.0.0"
        description: The IP address to bind on.
      elasticsearch_network_port:
        type: "int"
        default: 9200
        description: The port to bind on.
      elasticsearch_discovery_seed_hosts:
        type: "list"
        default: []
        description: Provides a list of the addresses of the master-eligible nodes in the cluster.
      elasticsearch_cluster_initial_master_nodes:
        type: "list"
        default: []
        description: Sets the initial set of master-eligible nodes in a brand-new cluster.
Benefits of using arguments_specs include:
- Fast
- Built in (since +- 2020)
- Can be used to generate docs.
A limitation is that you can only test a single variable, no combinations and the tests on that single variable are limited.
assert
You can also ansible.builtin.assert variables.
---

- name: Include assert.yml
  ansible.builtin.import_tasks: assert.yml
  run_once: yes
  delegate_to: localhost
---

- name: Test if elasticsearch_type is set correctly
  ansible.builtin.assert:
    that:
      - elasticsearch_type is defined
      - elasticsearch_type is string
      - elasticsearch_type in [ "elastic", "oss" ]
    quiet: yes

- name: Test if elasticsearch_network_host is set correctly
  ansible.builtin.assert:
    that:
      - elasticsearch_network_host is defined
      - elasticsearch_network_host is string
    quiet: yes

- name: Test if elasticsearch_http_port is set correctly
  ansible.builtin.assert:
    that:
      - elasticsearch_http_port is defined
      - elasticsearch_http_port is number
      - elasticsearch_http_port >=1
      - elasticsearch_http_port <= 65536
    quiet: yes

- name: Test if elasticsearch_discovery_seed_hosts is set correctly
  ansible.builtin.assert:
    that:
      - elasticsearch_discovery_seed_hosts is defined
      - elasticsearch_discovery_seed_hosts is iterable
    quiet: yes

- name: Test if elasticsearch_cluster_initial_master_nodes is set correctly
  ansible.builtin.assert:
    that:
      - elasticsearch_cluster_initial_master_nodes is defined
      - elasticsearch_cluster_initial_master_nodes is iterable
    quiet: yes
This does something similar as the argument_specs described earlier.
Benefits of assert include:
- You can test more things of a single variable.
- You can set an error message.
- You can combine tests on multiple variables.
Determine the amount of nodes to run on simultanious.
Sometimes you want to limit the number of nodes being addressed at one time. One-host-at-a-time for example:
- name: Do something machine-by-machine
  hosts: web_servers
  serial: 1

  ...
In the example above, only one node will be targeted at a time. This can be useful for updates to hosts behind a load balancer for example.
Host by host or as fast as possible
The normal strategy of Ansible is linear: Execute one task on targeted nodes, after that, continue with the next task:
TASK [Do step one] ***
changed: [node_1]
changed: [node_2]
changed: [node_3]

TASK [Do step two] ***
changed: [node_1]
changed: [node_2]
changed: [node_3]
You can also instruct Ansible to “go as fast as possible” by setting the strategy to free. This runs each task on targeted nodes, but does not wait until all hosts have completed a task. This also means there are limitations; when ordering of the tasks is important, this strategy can’t be used.
- name: Do something as fast as possible
  hosts: web_servers
  strategy: free

  tasks:
    - name: Update all software
      ansible.builtin.package:
        name: "*"
        state: latest
      notify:
        - Reboot

  handlers:
    - name: Reboot
      ansible.builtin.reboot:
The above sequence runs the jobs (Update all software and Reboot) as fast as possible; one node may be updating, the other can be rebooting, or even already be finished.
Grouping tasks
In a task-list it can be useful to group tasks. Likely because they share something. (A notify or when for example.) You can even group tasks because you like it, or if it increases readability.
- name: Do something to Debian
  when:
    - ansible_distribution == "Debian"
  notify:
    - Some Debian handler
  block:
    - name: Taks 1
      ...
    - name: Task 2
The block (Do something to Debian) shares a notify and when for both tasks.
- When the condition (
when) is met, two tasks will run.
- When any of the tasks is
changed, the handler Some Debian handler will be called.
Catching failures
The block statement can also be used to “catch” a possible failure.
- name: Do something
  hosts: web_servers
  become: no
  gather_facts: no

  tasks:
    - name: Start the webserver
      block:
        - name: Start httpd
          ansible.builtin.service:
            name: httpd
            state: started
      rescue:
        - name: Install httpd
          ansible.builtin.package:
            name: httpd
      always:
        - name: Show a message
          ansible.builtin.debug:
            msg: "Hello!"
Although the example above makes no sense, it does demonstrate how the rescue statement works. “If starting httpd fails, install httpd.” (What’s incorrect here is that there can be many more reasons for httpd to fail, plus if it fails, httpd would be installed, but never started. Weird.
The alwasy will run anyway, no matter what the first (Start httpd) task does.
I’m not a big fan of block, rescue & always, it increases complexity, can possible show red output (errors), which can throw of people. I would rather use some tasks sequence that first checks things, and based on the results, execute some action.
Variables
Wow, this is going to be a large chapter. Variables can be set and used in many ways in Ansible. Let’s cover a few edge-cases.
Gathering facts
facts are details of a node, for example ansible_distribution. These can be used anywhere to make desicions. A common way to use this:
- name: Do something on Debian systems
  ansible.builtin.debug:
    msg: "I am running ."
  when:
    - ansible_distribution == "Debian"
You can also map values to a distribution in vars/main.yml:
_package_to_install:
  Debian: x
  RedHat:
    - y
    - z

package_to_install: ""
The package_to_install variable can now be used in a regular task, for example: tasks/main.yml
- name: install package
  ansible.builtin.package:
    name: ""
You can also introduce a default value:
_package_to_install:
  default: x
  Debian: y
  RedHat: z

package_to_install: ""
This way of working allows the tasks/main.yml to be readable.
Use a variable from another host
Image you have a couple of hosts and you’ve set_fact or register-ed something on node-1 that you need on node-2.
- name: Set a variable on node-1
  hosts: node-1

  tasks:
    ansible.builtin.set_fact:
      some_variable: some_value

- name: Get a variable from node-1 on node-2
  hosts: node-2

  tasks:
    ansible.builtin.debug:
      msg: "The value of some_variable on node-1 is: hostvars['node-1']['some_variable']
Complexity
Sometimes you need a bit of complexity to finish a role or playbook. I would suggest to use this list, starting with “keep it simple”, going down to “hide your complexity here”.
default/main.yml (Or any other user-overwritable variable) - Keep this very simple. Users will interface with your code here.tasks/*.yml and handlers/*.yml - This can be a little more complex. Users are not expected to read this, some will peek here.vars/main.yml - This is where complexity lives. Keep all your data, filters and lookups here when possible.
Lint
Ansible lint is always right.
Well, that being said, you can overrule ansible-lint by setting the ` # noqa` argument. (Mind you: space-space-hash-space-identifier)
- name: Update all software (yum)
  ansible.builtin.yum:
    name: "*"
    state: latest  # noqa package-latest This role is to update packages.
Try to understand what Ansible lint is trying to tell you, likely you need to restructure your code until Ansible lint is happy.
General
- Optimize for readability.
- Spread things vertically when possible.
Ansible versions
Ansible has had a few changes in the used version. This table illustrates the versions and the relation to collections.
Sources:
- https://access.redhat.com/support/policy/updates/ansible-engine
- https://www.ansible.com/blog/getting-started-with-ansible-collections
- https://docs.ansible.com/ansible/latest/user_guide/collections_using.html
- https://docs.ansible.com/ansible/latest/reference_appendices/release_and_maintenance.html
- https://www.ansible.com/blog/ansible-3.0.0-qa
- https://docs.ansible.com/ansible/latest/roadmap/COLLECTIONS_2_10.html
- https://github.com/ansible-community/ansible-build-data
There are a couple of ways to loop in Terraform. Let’s have a look.
Count
This is the “oldest” method. It’s quite powerful.
resource "some_resource" "some_name" {
  count = 3
  name  = "my_resource_${count.index}"
}
As you can see, the resource some_resource is being created 3 (count = 3) times.
The name should be unique, so the count.index variable is used. This variable is available when using count.
The variable count.index has these values:
| itteration |
count.index value |
| first |
0 |
| second |
1 |
| third |
2 |
And so on.
Counting and looking up values
The parameter count sounds simple, but is actually quite powerful. Lets have a look at this example.
Here is a sample .tfvars file:
virtual_machines = [
  {
    name = "first"
    size = 16
  },
  {
    name = "second"
    size = 32
  }
]
The above structure is a “list of maps”:
- List is indicated by the
[ and ] character.
- Map is indicated by the
{ and } character.
Now lets loop over that list:
resource "fake_virtual_machine" "default" {
  count = length(var.virtual_machines)
  name  = var.virtual_machines[count.index].name
  size  = var.virtual_machines[count.index].size
}
A couple of tricks happen here:
count is calculated by the length function. It basically counts how many maps there are in the list virtual_machines.name is looked-up in the variable var.virtual_machines. Pick the first (0) entry from var.virtual_machines in the first itteration.- Similarly
size is looked up.
This results in two resources:
resource "fake_virtual_machine" "default" {
  name  = "first"
  size  = 16
}

# NOTE: This code does not work; `default` may not be repeated. It's just to explain what happens.
resource "fake_virtual_machine" "default" {
  name  = "second"
  size  = 32
}
For each
The looping mechanism for_each can also be used. Similar to the count example, let’s think of a data structure to make virtual machines:
virtual_machines = [
  {
    name = "first"
    size = 16
  },
  {
    name = "second"
    size = 32
  }
]
And let’s use for_each to loop over this structure.
resource "fake_virtual_machine" "default" {
  for_each = var.virtual_machines
  name = each.value.name
  size = each.value.size
}
This pattern creates exactly the same resources as the count example.
Dynamic block
Imagine there is some block in the fake_virtual_machine resource, like this:
resource "fake_virtual_machine" "default" {
  name = "example"
  disk {
    name = "os"
    size = 32
  }
  disk {
    name = "data"
    size = 128
  }
}
The variable structure we’ll use looks like this:
virtual_machines = [
  {
    name = "first"
    disks [
      {
        name = "os"
        size = 32
      },
      {
        name = "data"
        size = 128
      }
    ]
  },
  {
    name = "second"
    disks [
      {
        name = "os"
        size = 64
      },
      {
        name = "data"
        size = 256
      }
    ]
  }
]
As you can see:
- A list of
virtual_machines.
- Each virtual_machine has a list of
disks.
Now let’s introduce the dynamic block:
resource "fake_virtual_machine" "default" {
  for_each = var.virtual_machines
  name = each.value.name
  dynamic "disk" {
    for_each = each.value.disks
    content {
      name = disk.value.name
      size = disk.value.size
    }
  }
}
Wow, that’s a lot to explain:
- The
dynamic "disk" { starts a dynamic block. The name (“disk”) must reflect the parameter in the resource, not juts any name. Now a new object is available; disk.
- The
for_each = each.value.disks loops the dynamic block. The loop uses disks from an already looped value var.virtual_machines.
- The
content { block will be rendered by Terraform.
- The
name = disk.value.name uses the disk variable (created by the block iterator disk) to find the value from the disks map.
Hope that helps a bit when writing loops in Terraform!
Looping is quite an important mechanism in coding. (Thanks @Andreas for the word coding, a mix of scripting and programming.)
Looping allows you to write a piece of logic once, and reuse it as many times are required.
Looping is difficult to understand for new people new to coding. It’s sometimes difficult for me to. This article will probably help me a bit too!
A sequence
The simplest loop I know is repeating a piece of logic for a set of number or letters, like this:
First off, here is how to generate a sequence:
| bash |
ansible |
terraform |
seq 1 3 |
with_sequence: start=1 end=3 |
range(1, 3) |
{1..3} |
|
|
For all languages, this returns a list of numbers.
| bash |
ansible |
terraform |
1 2 3 |
item: 1, item: 2, item: 3 |
[ 1, 2, 3, ] |
So, a more complete example for the three languages:
Bash
for number in {1..3} ; do
  echo "number: ${number}
done
The above script returns:
Ansible
- name: show something
  debug:
    msg: "number: "
  with_sequence:
    start=1
    end=3
Note: See that = sign, I was expecting a : so made an issue.
The above script returns:
ok: [localhost] => (item=1) => {
    "msg": "1"
}
ok: [localhost] => (item=2) => {
    "msg": "2"
}
ok: [localhost] => (item=3) => {
    "msg": "3"
}
locals {
  numbers = range(1,4)
}

output "number" {
  value = local.numbers
}
The above script returns:
number = tolist([
  1,
  2,
  3,
])
Ansible testing components
To test Ansible, I use quite some components. This page lists the components uses, their versions, and where they are used.
| Component |
Used |
Latest |
Used where |
| ansible |
2.9 |
2.9.18 |
tox.ini |
| ansible |
2.10 |
2.10.7 |
tox.ini |
| molecule |
>=3,<4 |
 |
docker-github-action-molecule |
| tox |
latest |
n.a. |
docker-github-action-molecule |
| ansible-lint |
latest |
 |
docker-github-action-molecule |
| pre-commit |
2.9.3 |
v2.10.1 |
nstalled on development desktop. |
| molecule-action |
2.6.16 |
 |
.github/workflows/molecule.yml |
| github-action-molecule |
3.0.6 |
 |
.gitlab-ci.yml |
| ubuntu |
20.04 |
20.04 |
.github/workflows/galaxy.yml |
| ubuntu |
20.04 |
20.04 |
.github/workflows/molecule.yml |
| ubuntu |
20.04 |
20.04 |
.github/workflows/requirements2png.yml |
| ubuntu |
20.04 |
20.04 |
.github/workflows/todo.yml |
| galaxy-action |
1.1.0 |
 |
.github/workflows/galaxy.yml |
| graphviz-action |
1.0.7 |
 |
.github/workflows/requirements2png.yml |
| checkout |
v2 |
 |
.github/workflows/requirements2png.yml |
| checkout |
v2 |
|
.github/workflows/molecule.yml |
| todo-to-issue |
v2.3 |
 |
.github/workdlows/todo.yml |
| python |
3.9 |
3.9 |
.travis.yml |
| pre-commit-hooks |
v3.4.0 |
 |
.pre-commit-config.yaml |
| yamllint |
v1.26.0 |
v1.26.0 |
.pre-commit-config.yaml |
| my pre-commit |
v1.1.2 |
 |
.pre-commit-config.yaml |
| fedora |
33 |
33 |
docker-github-action-molecule |
Debugging GitLab builds
Now that Travis has become unusable, I’m moving stuff to GitLab. Some builds are breaking, this is how to reproduce the errors.
Start the dind container
export role=ansible-role-dns
cd Documents/github/robertdebock
docker run --rm --name gitlabci --volume $(pwd)/${role}:/${role}:z --privileged --tty --interactive docker:stable-dind
Login to the dind container
docker exec --tty --interactive gitlabci /bin/sh
Install software
The dind image is Alpine based and misses required software to run molecule or tox.
apk add --no-cache python3 python3-dev py3-pip gcc git curl build-base autoconf automake py3-cryptography linux-headers musl-dev libffi-dev openssl-dev openssh
Tox
GitLab CI tries to run tox (if tox.ini is found). To emulate GitLab CI, run:
python3 -m pip install tox --ignore-installed
And simply run tox to see the results.
Molecule
For more in-depth troubleshooting, try installing molecule:
python3 -m pip install ansible molecule[docker] docker ansible-lint
Now you can run molecule:
cd ${role}
molecule test --destroy=never
molecule login
Digitalocean Sizes and Images
I tend to forget the output of doctl compute size list -t ${DIGITALOCEAN_TOKEN} and doctl compute image list -t ${DIGITALOCEAN_TOKEN} --public, so here is a dump if the two commands.
Sizes.
| slug |
memory (mb) |
vcpu |
disk (gb) |
price/month($) |
price/hour($) |
| s-1vcpu-1gb |
1024 |
1 |
25 |
5.00 |
0.007440 |
| 512mb |
512 |
1 |
20 |
5.00 |
0.007440 |
| s-1vcpu-2gb |
2048 |
1 |
50 |
10.00 |
0.014880 |
| 1gb |
1024 |
1 |
30 |
10.00 |
0.014880 |
| s-3vcpu-1gb |
1024 |
3 |
60 |
15.00 |
0.022320 |
| s-2vcpu-2gb |
2048 |
2 |
60 |
15.00 |
0.022320 |
| s-1vcpu-3gb |
3072 |
1 |
60 |
15.00 |
0.022320 |
| s-2vcpu-4gb |
4096 |
2 |
80 |
20.00 |
0.029760 |
| 2gb |
2048 |
2 |
40 |
20.00 |
0.029760 |
| s-4vcpu-8gb |
8192 |
4 |
160 |
40.00 |
0.059520 |
| m-1vcpu-8gb |
8192 |
1 |
40 |
40.00 |
0.059520 |
| c-2 |
4096 |
2 |
25 |
40.00 |
0.059520 |
| 4gb |
4096 |
2 |
60 |
40.00 |
0.059520 |
| c2-2vcpu-4gb |
4096 |
2 |
50 |
45.00 |
0.066960 |
| g-2vcpu-8gb |
8192 |
2 |
25 |
60.00 |
0.089290 |
| gd-2vcpu-8gb |
8192 |
2 |
50 |
65.00 |
0.096730 |
| m-16gb |
16384 |
2 |
60 |
75.00 |
0.111610 |
| s-8vcpu-16gb |
16384 |
8 |
320 |
80.00 |
0.119050 |
| m-2vcpu-16gb |
16384 |
2 |
50 |
80.00 |
0.119050 |
| s-6vcpu-16gb |
16384 |
6 |
320 |
80.00 |
0.119050 |
| c-4 |
8192 |
4 |
50 |
80.00 |
0.119050 |
| 8gb |
8192 |
4 |
80 |
80.00 |
0.119050 |
| c2-4vpcu-8gb |
8192 |
4 |
100 |
90.00 |
0.133930 |
| m3-2vcpu-16gb |
16384 |
2 |
150 |
100.00 |
0.148810 |
| g-4vcpu-16gb |
16384 |
4 |
50 |
120.00 |
0.178570 |
| so-2vcpu-16gb |
16384 |
2 |
300 |
125.00 |
0.186010 |
| m6-2vcpu-16gb |
16384 |
2 |
300 |
125.00 |
0.186010 |
| gd-4vcpu-16gb |
16384 |
4 |
100 |
130.00 |
0.193450 |
| m-32gb |
32768 |
4 |
90 |
150.00 |
0.223210 |
| so1_5-2vcpu-16gb |
16384 |
2 |
450 |
155.00 |
0.230650 |
| m-4vcpu-32gb |
32768 |
4 |
100 |
160.00 |
0.238100 |
| s-8vcpu-32gb |
32768 |
8 |
640 |
160.00 |
0.238100 |
| c-8 |
16384 |
8 |
100 |
160.00 |
0.238100 |
| 16gb |
16384 |
8 |
160 |
160.00 |
0.238100 |
| c2-8vpcu-16gb |
16384 |
8 |
200 |
180.00 |
0.267860 |
| m3-4vcpu-32gb |
32768 |
4 |
300 |
195.00 |
0.290180 |
| g-8vcpu-32gb |
32768 |
8 |
100 |
240.00 |
0.357140 |
| s-12vcpu-48gb |
49152 |
12 |
960 |
240.00 |
0.357140 |
| so-4vcpu-32gb |
32768 |
4 |
600 |
250.00 |
0.372020 |
| m6-4vcpu-32gb |
32768 |
4 |
600 |
250.00 |
0.372020 |
| gd-8vcpu-32gb |
32768 |
8 |
200 |
260.00 |
0.386900 |
| m-64gb |
65536 |
8 |
200 |
300.00 |
0.446430 |
| so1_5-4vcpu-32gb |
32768 |
4 |
900 |
310.00 |
0.461310 |
| m-8vcpu-64gb |
65536 |
8 |
200 |
320.00 |
0.476190 |
| s-16vcpu-64gb |
65536 |
16 |
1280 |
320.00 |
0.476190 |
| c-16 |
32768 |
16 |
200 |
320.00 |
0.476190 |
| 32gb |
32768 |
12 |
320 |
320.00 |
0.476190 |
| c2-16vcpu-32gb |
32768 |
16 |
400 |
360.00 |
0.535710 |
| m3-8vcpu-64gb |
65536 |
8 |
600 |
390.00 |
0.580360 |
| g-16vcpu-64gb |
65536 |
16 |
200 |
480.00 |
0.714290 |
| s-20vcpu-96gb |
98304 |
20 |
1920 |
480.00 |
0.714290 |
| 48gb |
49152 |
16 |
480 |
480.00 |
0.714290 |
| so-8vcpu-64gb |
65536 |
8 |
1200 |
500.00 |
0.744050 |
| m6-8vcpu-64gb |
65536 |
8 |
1200 |
500.00 |
0.744050 |
| gd-16vcpu-64gb |
65536 |
16 |
400 |
520.00 |
0.773810 |
| m-128gb |
131072 |
16 |
340 |
600.00 |
0.892860 |
| so1_5-8vcpu-64gb |
65536 |
8 |
1800 |
620.00 |
0.922620 |
| m-16vcpu-128gb |
131072 |
16 |
400 |
640.00 |
0.952380 |
| s-24vcpu-128gb |
131072 |
24 |
2560 |
640.00 |
0.952380 |
| c-32 |
65536 |
32 |
400 |
640.00 |
0.952380 |
| 64gb |
65536 |
20 |
640 |
640.00 |
0.952380 |
| c2-32vpcu-64gb |
65536 |
32 |
800 |
720.00 |
1.071430 |
| m3-16vcpu-128gb |
131072 |
16 |
1200 |
785.00 |
1.168150 |
| m-24vcpu-192gb |
196608 |
24 |
600 |
960.00 |
1.428570 |
| g-32vcpu-128gb |
131072 |
32 |
400 |
960.00 |
1.428570 |
| s-32vcpu-192gb |
196608 |
32 |
3840 |
960.00 |
1.428570 |
| so-16vcpu-128gb |
131072 |
16 |
2400 |
1000.00 |
1.488100 |
| m6-16vcpu-128gb |
131072 |
16 |
2400 |
1000.00 |
1.488100 |
| gd-32vcpu-128gb |
131072 |
32 |
800 |
1040.00 |
1.547620 |
| m-224gb |
229376 |
32 |
500 |
1100.00 |
1.636900 |
| m3-24vcpu-192gb |
196608 |
24 |
1800 |
1175.00 |
1.748510 |
| g-40vcpu-160gb |
163840 |
40 |
500 |
1200.00 |
1.785710 |
| so1_5-16vcpu-128gb |
131072 |
16 |
3600 |
1240.00 |
1.845240 |
| m-32vcpu-256gb |
262144 |
32 |
800 |
1280.00 |
1.904760 |
| gd-40vcpu-160gb |
163840 |
40 |
1000 |
1300.00 |
1.934520 |
| so-24vcpu-192gb |
196608 |
24 |
3600 |
1500.00 |
2.232140 |
| m6-24vcpu-192gb |
196608 |
24 |
3600 |
1500.00 |
2.232140 |
| m3-32vcpu-256gb |
262144 |
32 |
2400 |
1565.00 |
2.328870 |
| so1_5-24vcpu-192gb |
196608 |
24 |
5400 |
1850.00 |
2.752980 |
| so-32vcpu-256gb |
262144 |
32 |
4800 |
2000.00 |
2.976190 |
| m6-32vcpu-256gb |
262144 |
32 |
4800 |
2000.00 |
2.976190 |
| so1_5-32vcpu-256gb |
262144 |
32 |
7200 |
2480.00 |
3.690480 |
images
| slug |
distribution |
disk (gb) |
name |
| centos-6-x32 |
CentOS |
20 |
6.9 x32 |
| centos-6-x64 |
CentOS |
20 |
6.9 x64 |
| ubuntu-16-04-x32 |
Ubuntu |
20 |
16.04.6 (LTS) x32 |
| freebsd-12-x64 |
FreeBSD |
20 |
12.1 ufs x64 |
| rancheros |
RancherOS |
20 |
v1.5.6 |
| centos-8-x64 |
CentOS |
15 |
8.2 x64 |
| debian-10-x64 |
Debian |
15 |
10 x64 |
| debian-9-x64 |
Debian |
15 |
9 x64 |
| freebsd-11-x64-zfs |
FreeBSD |
15 |
11.4 zfs x64 |
| freebsd-11-x64-ufs |
FreeBSD |
15 |
11.4 ufs x64 |
| centos-7-x64 |
CentOS |
20 |
7.6 x64 |
| fedora-32-x64 |
Fedora |
15 |
32 x64 |
| ubuntu-18-04-x64 |
Ubuntu |
15 |
18.04 (LTS) x64 |
| ubuntu-20-04-x64 |
Ubuntu |
15 |
20.04 (LTS) x64 |
| ubuntu-16-04-x64 |
Ubuntu |
15 |
16.04 (LTS) x64 |
| ubuntu-20-10-x64 |
Ubuntu |
15 |
20.10 x64 |
| fedora-33-x64 |
Fedora |
15 |
33 x64 |
| freebsd-12-x64-ufs |
FreeBSD |
20 |
12.2 ufs x64 |
| freebsd-12-x64-zfs |
FreeBSD |
15 |
12.2 zfs x64 |
| freebsd-12-1-x64-ufs |
FreeBSD |
20 |
12.1 ufs x64 |
| freebsd-12-1-x64-zfs |
FreeBSD |
20 |
12.1 zfs x64 |
| skaffolder-18-04 |
Ubuntu |
25 |
Skaffolder 3.0 on Ubuntu 18.04 |
| izenda-18-04 |
Ubuntu |
20 |
Izenda 3.3.1 on Ubuntu 18.04 |
| quickcorp-qcobjects-18-04 |
Ubuntu |
25 |
QCObjects 2.1.157 on Ubuntu 18.04 |
| fathom-18-04 |
Ubuntu |
25 |
Fathom on 18.04 |
| optimajet-workflowserver-18-04 |
Ubuntu |
25 |
WorkflowServer 2.5 on Ubuntu 18.04 |
| nimbella-18-04 |
Ubuntu |
25 |
Nimbella Lite on Ubuntu 18.04 |
| snapt-snaptaria-18-04 |
Ubuntu |
25 |
Snapt Aria 2.0.0 on Ubuntu 18.04 |
| snapt-snaptnova-18-04 |
Ubuntu |
25 |
Snapt Nova ADC (Load Balancer, WAF) 1.0.0 on Ubuntu 18.04 |
| weconexpbx-7-6 |
CentOS |
25 |
WeconexPBX 2.4-1 on CentOS 7.6 |
| bitwarden-18-04 |
Ubuntu |
50 |
Bitwarden 1.32.0 on Ubuntu 18.04 |
| buddy-18-04 |
Ubuntu |
160 |
Buddy on Ubuntu 18.04 |
| sharklabs-minecraftjavaedi-18-04 |
Ubuntu |
25 |
Minecraft: Java Edition Server 1.0 on Ubuntu 18.04 |
| selenoid-18-04 |
Ubuntu |
25 |
Selenoid 1.10.0 on Ubuntu 18.04 |
| litespeedtechnol-openlitespeednod-18-04 |
Ubuntu |
25 |
OpenLiteSpeed NodeJS 12.16.3 on Ubuntu 20.04 |
| simontelephonics-freepbx-7-6 |
CentOS |
25 |
FreePBX® 15 on CentOS 7.6 |
| buddy-repman-18-04 |
Ubuntu |
25 |
Repman 0.4.1 on Ubuntu 18.04 (LTS) |
| strapi-18-04 |
Ubuntu |
50 |
Strapi 3.1.0 on Ubuntu 18.04 |
| wftutorials-purdm-18-04 |
Ubuntu |
25 |
Purdm 0.3a on Ubuntu 18.04 |
| caprover-18-04 |
Ubuntu |
25 |
CapRover 1.8.0 on Ubuntu 18.04 |
| searchblox-searchbloxenterp-7-6 |
CentOS |
320 |
SearchBlox Enterprise Search 9.2.1 on CentOS 7.6 |
| gitea-18-04 |
Ubuntu |
25 |
Gitea 1.12.4 on Ubuntu 20.04 |
| kandralabs-zulip-18-04 |
Ubuntu |
50 |
Zulip 3.2 on Ubuntu 18.04 |
| vodianetworks-vodiaphonesystem-10 |
Debian |
25 |
Vodia Multi-tenant Cloud PBX 66 on Debian 10 x64 |
| flipstarter-18-04 |
Ubuntu |
25 |
Flipstarter 1.1.1 on Ubuntu 18.04 |
| gluu-gluuserverce-18-04-3 |
Ubuntu |
160 |
Gluu Server CE 4.2.1 on Ubuntu 20.04 (LTS) |
| netfoundry-7-6 |
CentOS |
25 |
NetFoundry Zero Trust Networking 7.3.0 on CentOS 7.8 |
| aplitel-vitalpbx-7 |
CentOS |
25 |
VitalPBX 3.0.4-1 on Centos 7.8 |
| cloudron-18-04 |
Ubuntu |
25 |
Cloudron 5.6.3 on Ubuntu 18.04 |
| sharklabs-pacvim-18-04 |
Ubuntu |
25 |
PacVim on Ubuntu 18.04 |
| eltrino-magento2opensour-18-04 |
Ubuntu |
80 |
Magento 2 Open Source 1.3.1 on Ubuntu 20.04 (LTS) |
| solidinvoice-18-04 |
Ubuntu |
25 |
SolidInvoice 2.0.3 on Ubuntu 18.04 |
| opencart-18-04 |
Ubuntu |
25 |
OpenCart 3.0.3 on Ubuntu 18.04 |
| unlight-openunlight-18-04 |
Ubuntu |
30 |
Open Unlight 1.0.0.pre1 on Ubuntu 18.04 |
| supabase-supabaserealtime-18-04 |
Ubuntu |
20 |
Supabase Realtime 0.7.5 on Ubuntu 18.04 |
| runcloud-18-04 |
Ubuntu |
25 |
RunCloud-18.04 on Ubuntu 18.04 |
| runcloud-runcloud2004-20-04 |
Ubuntu |
25 |
RunCloud-20.04 on Ubuntu 20.04 |
| supabase-supabasepostgres-18-04 |
Ubuntu |
25 |
Supabase Postgres 0.13.0 on Ubuntu 18.04 |
| nmtec-erxes-18-04 |
Ubuntu |
80 |
Erxes 0.17.6 on Ubuntu 18.04 |
| fastnetmon-18-04 |
Ubuntu |
25 |
FastNetMon 2.0 on Ubuntu 18.04 |
| cyberscore-18-04 |
Ubuntu |
25 |
CyberScore 5.0.1 on Ubuntu 18.04.3 |
| shiftedit-serverwand-18-04 |
Ubuntu |
25 |
ServerWand 1.0 on Ubuntu 18.04 |
| ultrahorizon-uhvpn-18-04 |
Ubuntu |
25 |
UH VPN 1.2.0 on Ubuntu 20.04 |
| meilisas-meilisearch-10 |
Debian |
25 |
MeiliSearch 0.16.0 on Debian 10 (buster) |
| helpy-18-04 |
Ubuntu |
25 |
Helpy 2.4 on 18.04 |
| deadcanaries-onionroutedcloud-18-04 |
Ubuntu |
25 |
Onion Routed Cloud 14 on 18.04 |
| dokku-18-04 |
Ubuntu |
20 |
Dokku 0.17.9 on 18.04 |
| mysql-18-04 |
Ubuntu |
20 |
MySQL on 18.04 |
| phpmyadmin-18-04 |
Ubuntu |
20 |
PhpMyAdmin on 18.04 |
| jenkins-18-04 |
Ubuntu |
25 |
CloudBees Jenkins on 18.04 |
| influxdb-18-04 |
Ubuntu |
25 |
Influx TICK on 18.04 |
| invoiceninja-18-04 |
Ubuntu |
25 |
Invoice Ninja 1.0.0 on Ubuntu 18.0.4 |
| zeromon-zabbix-18-04 |
Ubuntu |
25 |
Zeromon Zabbix 4 on Ubuntu 18.04 |
| lemp-18-04 |
Ubuntu |
20 |
LEMP on 18.04 |
| nakama-18-04 |
Ubuntu |
25 |
Nakama 2.7.0 on Ubuntu 18.04 |
| redash-18-04 |
Ubuntu |
30 |
Redash 8.0.0 on Ubuntu 18.04 |
| mattermost-18-04 |
Ubuntu |
20 |
Mattermost 5.16.3 on Ubuntu 18.04 |
| rethinkdb-rethinkdbfantasi-18-04 |
Ubuntu |
25 |
RethinkDB (Fantasia) 2.3.7 on Ubuntu 18.04 |
| openlitespeed-wp-18-04 |
Ubuntu |
25 |
OpenLiteSpeed WordPress 5.3 on Ubuntu 18.04 |
| sharklabs-ninjam-10-0 |
Debian |
25 |
Ninjam on Debian 10.0 x64 |
| workarea-18-04 |
Ubuntu |
25 |
Workarea 3.5.x on Ubuntu 18.04 |
| gitlab-meltano-18-04 |
Ubuntu |
25 |
Meltano 1.15.0 on Ubuntu 18.04 |
| rocketchat-18-04 |
Ubuntu |
25 |
Rocket.Chat 2.4.9 on Ubuntu 18.04 |
| reblaze-reblazewaf-18-04 |
Ubuntu |
25 |
Reblaze WAF 2.12.10 on Ubuntu 18.04 |
| sharklabs-nodejsquickstart-18-04 |
Ubuntu |
25 |
Node.js Quickstart 1.0 on Ubuntu 18.04 |
| rails-18-04 |
Ubuntu |
20 |
Ruby on Rails on 18.04 |
| sharklabs-foldinghome-18-04 |
Ubuntu |
25 |
Folding@home 0.0.1 on Ubuntu 18.04 |
| mastodon-18-04 |
Ubuntu |
25 |
Mastodon 3.1.3 on Ubuntu 18.04 |
| code-server-18-04 |
Ubuntu |
25 |
code-server 3.0.2 on Ubuntu 18.04 |
| discourse-18-04 |
Ubuntu |
20 |
Discourse 2.5.0.beta3 on Ubuntu 18.04 |
| mozilla-hubscloudpersona-18-04 |
Ubuntu |
25 |
Hubs Cloud Personal 1.1.0 on Ubuntu 18.04 |
| meltano-18-04 |
Ubuntu |
25 |
Meltano 1.31.0 on Ubuntu 18.04 |
| sharklabs-minecraftbedrock-20-04 |
Ubuntu |
25 |
Minecraft: Bedrock Edition 1.0 on Ubuntu 20.04 (LTS) |
| botpress-18-04 |
Ubuntu |
25 |
Botpress 12.9.1 on Ubuntu 18.04 |
| pihole-18-04 |
Ubuntu |
25 |
OpenVPN + Pihole 1.1.1 on Ubuntu 18.04 |
| azuracast-18-04 |
Ubuntu |
50 |
AzuraCast 0.10.3 on Ubuntu 20.04 |
| ascensiosystem-onlyoffice-18-04 |
Ubuntu |
80 |
ONLYOFFICE 20.02 on Ubuntu 18.04.4 LTS |
| ascensiosystemsi-onlyofficeeditor-18-04-4 |
Ubuntu |
80 |
ONLYOFFICE Editors 5.5.3 on Ubuntu 18.04.4 LTS |
| revox-keplerbuilder-18-04 |
Ubuntu |
25 |
Kepler Builder 1.0.10 on Ubuntu 18.04 |
| directus-18-04 |
Ubuntu |
25 |
Directus 8.8.1 on Ubuntu 18.04 |
| jadiangaming-solderio-18-04 |
Ubuntu |
25 |
Solder.io 0.7.6 on Ubuntu 18.04.5 |
| lamp-20-04 |
Ubuntu |
25 |
LAMP on Ubuntu 20.04 |
| rethinkdb-18-04 |
Ubuntu |
25 |
RethinkDB 2.4.1 on Ubuntu 18.04 |
| lamp-18-04 |
Ubuntu |
20 |
LAMP on Ubuntu 18.04 |
| litespeedtechnol-openlitespeedwor-18-04 |
Ubuntu |
25 |
OpenLiteSpeed WordPress 5.5 on Ubuntu 20.04 |
| litespeedtechnol-openlitespeedrai-20-04 |
Ubuntu |
25 |
OpenLiteSpeed Rails 2.7.1 on Ubuntu 20.04 |
| apisnetworks-apnscp-7-7 |
CentOS |
50 |
ApisCP 3.2 on CentOS 8.2 |
| litespeedtechnol-openlitespeeddja-18-04 |
Ubuntu |
25 |
OpenLiteSpeed Django 3.1.1 on Ubuntu 20.04 |
| litespeedtechnol-openlitespeedcla-18-04 |
Ubuntu |
25 |
OpenLiteSpeed ClassicPress 1.2.0 on Ubuntu 20.04 |
| curiositygmbh-curiosity-16-04 |
Ubuntu |
160 |
Curiosity 0.12549 on Ubuntu 16.04 |
| grafana-18-04 |
Ubuntu |
20 |
Grafana 7.2.0 on Ubuntu 18.04 |
| wordpress-18-04 |
Ubuntu |
25 |
WordPress 5.5.1 on Ubuntu 18.04 |
| wordpress-20-04 |
Ubuntu |
25 |
WordPress 5.5.1 on Ubuntu 20.04 |
| discourse-20-04 |
Ubuntu |
25 |
Discourse on Ubuntu 20.04 |
| mysql-20-04 |
Ubuntu |
25 |
MySQL 8.0.21 on Ubuntu 20.04 |
| phpmyadmin-20-04 |
Ubuntu |
25 |
PhpMyAdmin 5.0.3 on Ubuntu 20.04 |
| mongodb-20-04 |
Ubuntu |
25 |
MongoDB 4.4.1 on Ubuntu 20.04 |
| rails-20-04 |
Ubuntu |
25 |
Ruby on Rails 6.0.3.4 on Ubuntu 20.04 |
| caddy-18-04 |
Ubuntu |
25 |
Caddy 2.2.1 on Ubuntu 18.04 |
| mongodb-18-04 |
Ubuntu |
25 |
MongoDB 4.0.3 on Ubuntu 18.04 |
| lemp-20-04 |
Ubuntu |
25 |
LEMP on Ubuntu 20.04 |
| docker-18-04 |
Ubuntu |
25 |
Docker 19.03.12 on Ubuntu 18.04 |
| docker-20-04 |
Ubuntu |
25 |
Docker 19.03.12 on Ubuntu 20.04 |
| dokku-20-04 |
Ubuntu |
25 |
Dokku 0.21.4 on Ubuntu 20.04 |
| harperdb-18-04 |
Ubuntu |
25 |
HarperDB 2.2.2 on Ubuntu 18.04 |
| helpyio-helpypro-18-04 |
Ubuntu |
25 |
Helpy Pro 3.1 on Ubuntu 18.04 |
| selfhostedpro-yacht-20-04 |
Ubuntu |
25 |
Yacht 0.0.5-alpha on Ubuntu 20.04 |
| perconamonitorin-7 |
CentOS |
160 |
Percona Monitoring and Management 2 2.11.2 on CentOS 7 |
| litespeedtechnol-openlitespeedjoo-20-04 |
Ubuntu |
25 |
OpenLiteSpeed Joomla 3.9.22 on Ubuntu 20.04 |
| cyberpanel-18-04 |
Ubuntu |
25 |
CyberPanel 2.0.3 on Ubuntu 20.04 |
| varnishsoftware-varnishcache-18-04 |
Ubuntu |
25 |
Varnish Cache 6.0.7 on Ubuntu 18.04 |
| csmm-20-04 |
Ubuntu |
25 |
CSMM 1.19.4 on Ubuntu 20.04 |
| acra-18-04 |
Ubuntu |
25 |
Acra 0.85.0 on Ubuntu 18.04 |
| alfio-7-6 |
CentOS |
25 |
alf.io 2.0 on CentOS 7.6 |
| chamilo-18-04 |
Ubuntu |
25 |
Chamilo 1.11.10 on Ubuntu 18.04 |
| opentradestatist-rstudiopkgdev-18-04 |
Ubuntu |
25 |
RStudio + PkgDev 1.2 on Ubuntu 18.04 |
| simplystatistics-rstudio-18-04 |
Ubuntu |
25 |
RStudio 1.2 on Ubuntu 18.04 |
| zabbix-7-6 |
CentOS |
25 |
Zabbix 4.4.4 on CentOS 7 |
| opentradestatist-rstudioh2o-18-04 |
Ubuntu |
25 |
RStudio + H2O 1.2 on Ubuntu 18.04 |
| metabase-18-04 |
Ubuntu |
25 |
Metabase 0.34.2 on Ubuntu 18.04 |
| nlnetlabs-krill-18-04 |
Ubuntu |
25 |
Krill 0.6.0 on Ubuntu 18.04 |
| ghost-18-04 |
Ubuntu |
25 |
Ghost on Ubuntu 18.04 |
| nethesis-nethserver-7 |
CentOS |
25 |
NethServer 7.8.2003 on CentOS 7.x |
| iota-iotahornetnode-18-04 |
Ubuntu |
25 |
IOTA Hornet Node on Ubuntu 20.04 |
| microweber-18-04 |
Ubuntu |
25 |
Microweber 1.1.20 on Ubuntu 18.04 |
| passbolt-18-04 |
Ubuntu |
25 |
Passbolt CE 2.13.5 on Ubuntu 18.04 |
| opentradestatist-rstudiostan-18-04 |
Ubuntu |
25 |
RStudio + Stan 1.2 on Ubuntu 18.04 |
| opentradestatist-bigbluebuttonser-16-04 |
Ubuntu |
25 |
BigBlueButton Server 2.2 on Ubuntu 16.04 |
| livehelperchat-7-8-2003 |
CentOS |
25 |
Live Helper Chat 3.55 on Centos 7.8.2003 |
| deadletter-18-04 |
Ubuntu |
25 |
DeadLetter Facial Recognition on 18.04 |
| honeydbagent-9 |
Debian |
25 |
HoneyDB Agent on Debian 9 |
| nibblecomm-spotipo-18-04 |
Ubuntu |
25 |
Spotipo 3.4.13 on 18.04 |
| shopware-18-04 |
Ubuntu |
25 |
Shopware on Ubuntu 18.04 |
| 48660871 |
20 |
Plesk |
17.8 on CentOS 7 |
| memgraph-9-7 |
Debian |
25 |
Memgraph on Debian 9.7 |
| vardot-varbase-18-04 |
Ubuntu |
50 |
Varbase 8.7.11 on Ubuntu 18.04 |
| kromit-titra-18-04 |
Ubuntu |
25 |
titra 0.9.8 on Ubuntu 18.04 |
| dokos-18-04 |
Ubuntu |
80 |
Dokos 1.4.0 on Ubuntu 18.04 |
| xcart-7 |
CentOS |
25 |
X-Cart 5.4.1.4 on CentOS 7.6 |
| ispsystem-ispmanagerlite-7 |
CentOS |
25 |
ISPmanager Lite 5.246.0 on CentOS 7.x |
| akaunting-18-04 |
Ubuntu |
25 |
Akaunting on Ubuntu 18.04 |
| antmedia-16-04 |
Ubuntu |
25 |
Ant Media Server Community Edition 2.1.0 on Ubuntu 18.04 |
| devdojo-laravel-20-04 |
Ubuntu |
25 |
Laravel 7.20.0 on Ubuntu 20.04 |
| uxlens-18-04 |
Ubuntu |
80 |
UXLens 0.7 on Ubuntu 18.04 |
| mobilejazz-bugfender-18-04 |
Ubuntu |
80 |
Bugfender 2020.2.0 on Ubuntu 18.04 |
| opentradestatist-jitsiserver-18-04 |
Ubuntu |
25 |
Jitsi Server 2.1-273 on Ubuntu 18.04 |
| fastpanel-deb-9 |
Debian |
25 |
FASTPANEL 1.9+deb10p151 on Debian 10 |
| restya-restyaboard-18-04 |
Ubuntu |
25 |
Restyaboard 0.6.9 on Ubuntu 18.04 |
| restya-restyaboardcento-7-6 |
CentOS |
25 |
Restyaboard (CentOS) 0.6.9 on CentOS 7.6 |
| countly-18-04 |
Ubuntu |
80 |
Countly Analytics 20.04.1 on Ubuntu 18.04 |
| spatie-mailcoach-18-04 |
Ubuntu |
25 |
Mailcoach 3.0 on Ubuntu 18.04 |
| flashphoner-7-6 |
CentOS |
50 |
Flashphoner Web Call Server 5.2.780 on CentOS 7.6 |
| nodegame-18-04 |
Ubuntu |
25 |
NodeGame 6.0.2 on Ubuntu 18.04 |
| grandnode-18-04 |
Ubuntu |
25 |
GrandNode 4.80.0 on Ubuntu 18.04 |
| antmedia-antmediaserveren-16-04 |
Ubuntu |
25 |
Ant Media Server Enterprise Edition 2.2.1 on Ubuntu 18.04 |
| jelastic-jelasticpaas-7 |
CentOS |
160 |
Jelastic PaaS 5.9-6 on Centos 7 |
| plesk-7-6 |
CentOS |
25 |
Plesk (CentOS) 18.0 on CentOS 7.7 |
| plesk-18-04 |
Ubuntu |
25 |
Plesk 18.0 on Ubuntu 18.04 |
| ossn-18-04 |
Ubuntu |
25 |
Open Source Social Network 5.6.0 on Ubuntu 18.04 |
| mgtcommercegmbh-cloudpanel1-10-4 |
Debian |
25 |
CloudPanel 1 1.0.4 on Debian 10.6 |
| wikijs-18-04 |
Ubuntu |
25 |
Wiki.js 2.4.107 on Ubuntu 18.04 |
| analythium-shinyproxy-18-04 |
Ubuntu |
25 |
ShinyProxy 2.4.0 on Ubuntu 20.04 |
| analythium-opencpu-20-04 |
Ubuntu |
25 |
OpenCPU 2.2 on Ubuntu 20.04 |
| openfaas-18-04 |
Ubuntu |
25 |
OpenFaaS on Ubuntu 18.04 |
| thingsboard-18-04 |
Ubuntu |
20 |
ThingsBoard CE on Ubuntu 18.04 |
| thingsboardpe-18-04 |
Ubuntu |
20 |
ThingsBoard PE on Ubuntu 18.04 |
| openlitespeed-node-18-04 |
Ubuntu |
25 |
OpenLiteSpeed NodeJS 10.15.3 on Ubuntu 18.04 |
| openlitespeed-django-18-04 |
Ubuntu |
25 |
OpenLiteSpeed Django 2.2.3 on Ubuntu 18.04 |
| bcoin-18-04 |
Ubuntu |
20 |
bcoin on 18.04 |
| cpanel-7-6 |
CentOS |
25 |
cPanel & WHM® 84.0.14 on CentOS 7.6 |
| restyaboard-16-04 |
Ubuntu |
25 |
Restyaboard 0.6.8 on Ubuntu 16.04 |
| restyaboard-7-6 |
CentOS |
25 |
Restyaboard (CentOS) 0.6.8 on CentOS 7.6 |
| sharklabs-pythondjangoquic-18-04 |
Ubuntu |
25 |
Python/Django Quickstart 1.1 on Ubuntu 18.04 |
| ten7-computingforcovi-18-04-4 |
Ubuntu |
60 |
Computing for COVID 3 on Ubuntu 18.04.4 LTS |
| openvpn-18-04 |
Ubuntu |
25 |
OpenVPN Access Server 2.8.5 on Ubuntu 18.04 |
| cpanel-cpanelwhm-7-6 |
CentOS |
25 |
cPanel & WHM® 90.0.15 on CentOS 7.6 |
| nknfullnode-18-04 |
Ubuntu |
25 |
NKN Commercial 2.0 on Ubuntu 18.04 |
| prometheus-18-04 |
Ubuntu |
20 |
Prometheus 2.9.2 on Ubuntu 18.04 |
| onjection-jenkins-16-04 |
Ubuntu |
25 |
Onjection Jenkins 2.164.3 on Ubuntu 16.04 |
| flexify-18-04 |
Ubuntu |
20 |
Flexify 2.8.1 on Ubuntu 18.04 |
| vitalpointz-7-6 |
CentOS |
25 |
vitalpointz IoT Core Lite 1.2.0 on CentOS 7.6 |
| hasura-18-04 |
Ubuntu |
25 |
Hasura GraphQL on Ubuntu 18.04 |
| erpnext-18-04 |
Ubuntu |
160 |
ERPNext 12.5.0 on Ubuntu 18.04 |
| bagisto-18-04 |
Ubuntu |
25 |
Bagisto on 18.04 |
| seknox-trasa-20-04 |
Ubuntu |
25 |
TRASA 1.1.2 on Ubuntu 20.04 |
| zoomadmin-18-04 |
Ubuntu |
25 |
ZoomAdmin 2.0.1 on Ubuntu 18.04.03 |
| nodejs-20-04 |
Ubuntu |
20 |
NodeJS 12.18.0 on Ubuntu 20.04 |
| django-20-04 |
Ubuntu |
25 |
Django 2.2.12 on Ubuntu 20.04 |
| traccar-20-04 |
Ubuntu |
25 |
Traccar 4.10 on Ubuntu 20.04 |
YAML Anchors and References
This is a post to help me remind how YAML Anchors and References work.
What?
In YAML you can make an Anchor:
Now the Anchor me contains Robert. To refer to it, do something like this:
- first_name: &me Robert
  give_name: *me
The value for given_name has been set to Robert.
You can also anchor to a whole list item:
people:
  - person: &me
    name: Robert
    family_name: de Bock
No you may refer to the me anchor:
Now Robert has access.
Good to prevent dry.
Ansible alternatives for shell tricks
If you’re used to shells and their commands like bash, sed and grep, here are a few alternatives for Ansible.
Using these native alternatives has an advantage, developers maintain the Ansible modules for you, they are idempotent and likely work on more distributions or platforms.
Grep
Imagine you need to know if a certain patter is in a file. With a shell script you would use something like this:
grep "pattern" file.txt && do-something-if-pattern-is-found.sh
With Ansible you can achieve a similar result like this:
---
- hosts: all
  gather_facts: no

  tasks:
    - name: check if pattern if found
      lineinfile:
        path: file.txt
        regexp: '.*pattern.*'
        line: 'whatever'
      register: check_if_pattern_is_found
      check_mode: yes
      notify: do something

  handlers:
    - name: do something
      command: do-something-if-pattern-is-found.sh
Hm, much longer than the bash example, but native Ansible!
Sed
So you like sed? So do I. It’s one of the most powerful tools I’ve used.
Lets replace some pattern in a file:
sed 's/pattern_a/pattern_b/g' file.txt
This would repace all occurences of pattern_a for pattern_b. Lets see what Ansible looks like.
---
- name: replace something
  gather_facts: no

  tasks:
    - name: replace patterns
      lineinfile:
        path: file.txt
        regexp: '^(.*)pattern_a(.*)$'
        line: '\1pattern_b\2'
Have a look at the lineinfile module documentation for more details.
Find and remove.
The find (UNIX) tools is really powerful too, imagine this command:
find / -name some_file.txt -exec rm {} \;
That command would find all files (and directories) named some_file.txt and remove them. A bit dangerous, but powerful.
With Ansible:
- name: find and remove
  gather_facts: no

  tasks:
    - name: find files
      find:
        paths: /
        patterns: some_file.txt
      register: found_files

    - name: remove files
      file:
        path: "{{ item.path }}"
        state: absent
      loop: "{{ found_files.results }}"
Conclusion
Well, have fun with all non-shell solutions. You hardly needs the shell or command modules when you get the hang of it.
Debugging services in Ansible
Sometimes services don’t start and give an error like:
Unable to start service my_service: A dependency job for my_service.service failed. See 'journalctl -xe' for details.
Well, if you’re testing in CI, you can’t really access the instance that has an issue. So how to you troubleshoot this?
I use this pattern frequently:
- name: debug start my_service
  block:
    - name: start my_service
      service:
        name: "my_service"
        state: started
  rescue:
    - name: collect information
      command: "{{ item }}"
      register: my_service_collect_information
      loop:
        - journalctl --unit my_service --no-pager
        - systemctl status my_service
    - name: show information
      debug:
        msg: "{{ item }}"
      loop: "{{ my_service_collect_information.results }}"
What’s happening here?
- The
block is a grouping of tasks.
- The
rescue runs when the initial task (start my_service) fails. It has two tasks.
- The task
collect information runs a few commands, add extra is you know more and saves the results in my_service_collect_information.
- The task
show information displays the saved result. Because collect information has a loop, the variable has .results appended, which is a list to needs to be looped over.
Hope this helps you troubleshoot services in Travis of GitHub Actions.
5 times why
Why do I write all this code? What’s the purpose and were does it stop?
To answer this question, there is a method you can use: 5 times why. Answer the initial question and pose a new question: “Why?”. Repeat the process a couple of times until you get to the core of the reason. Let’s go.
1. Why do I write all this code?
Because it’s a great way to learn a language.
2. Why do I want to learn a new language?
Technology changes, this allows me to keep up to date.
3. Why do I need to be up to date?
Being up to date allows me to be relevant.
4. Why do I need to be relevant.
Being relevant allows me to steer my career.
5. Why do I need to steer my career?
I don’t want to depend on 1 single employer and have many options when choosing a job.
Conclusion
So, I write all this code to not depend on any one employer. Interesting conclusion, I tend to agree.
GitHub action to release to Galaxy
GitHub Actions is an approach to offering CI, using other peoples actions from the GitHub Action Marketplace.
I’m using 2 actions to:
- test the role using Molecule
- release the role to Galaxy
GitHub is offering 20 concurrent builds which is quite a lot, more than Travis’s limit of 5. The build could be 4 times faster. Faster CI, happier developers. ;-)
Here are a few examples. First; just release to Galaxy, no testing includes. (Not a smart idea)
---
name: GitHub Action

on:
  - push

jobs:
  release:
    runs-on: ubuntu-latest
    steps:
      - name: checkout
        uses: actions/checkout@v2
      - name: galaxy
        uses: robertdebock/galaxy-action@master
        with:
          galaxy_api_key: "$"
As you can see, 2 actions are used, checkout which gets the code and galaxy-action to push the role to Galaxy. Galaxy does lint-testing, but not functional testing. You can use the molecule-action to do that.
---
name: GitHub Action

on:
  - push

jobs:
  test:
    runs-on: ubuntu-latest
    steps:
      - name: checkout
        uses: actions/checkout@v2
        with:
          path: "$"
      - name: molecule
        uses: robertdebock/[email protected]
        with:
          image: "$"
  release:
    needs:
      - test
    runs-on: ubuntu-latest
    steps:
      - name: galaxy
        uses: robertdebock/galaxy-action@master
        with:
          galaxy_api_key: $
The build is split in 2 parts now; test and release and release needs test to be done.
You can also see that checkout is now called with a path which allows Molecule to find itself. (ANSIBLE_ROLES_PATH: $ephemeral_directory/roles/:$project_directory/../)
Finally you can include a matrix to build with a matrix of variables set.
---
name: GitHub Action

on:
  - push

jobs:
  test:
    runs-on: ubuntu-latest
    strategy:
      matrix:
        image:
          - alpine
          - amazonlinux
          - debian
          - centos
          - fedora
          - opensuse
          - ubuntu
    steps:
      - name: checkout
        uses: actions/checkout@v2
        with:
          path: "$"
      - name: molecule
        uses: robertdebock/[email protected]
        with:
          image: $
  release:
    needs:
      - test
    runs-on: ubuntu-latest
    steps:
      - name: galaxy
        uses: robertdebock/galaxy-action@master
        with:
          galaxy_api_key: $
Now your role is tested on the list of images specified.
Hope these actions make it easier to develop, test and release your roles, if you find problems, please make an issue for either the molecule or galaxy action.
GitHub action to run Molecule
GitHub Actions is an approach to offering CI, using other peoples actions from the GitHub Action Marketplace.
The intent is to let a developer of an Action think about ‘hard stuff’ and the user of an action simply include another step into a workflow.
So; I wrote a GitHub action to test an Ansible role with a single action.
Using the GitHub Action.
Have a look at the Molecule action.
It boils down to adding this snippet to .github/workflows/molecule.yml:
---
on:
  - push

jobs:
  build:
    runs-on: ubuntu-latest
    steps:
      - name: checkout
        uses: actions/checkout@v2
        with:
          path: "$"
      - name: molecule
        uses: robertdebock/molecule-action@master
How it works
You may want to write your own action, here is an overview of the required components.
+--- Repository with an Ansible role ---+
| - .github/workflows/molecule.yml      |
+-+-------------------------------------+
  |
  |    +-------- robertdebock/molecule-action --------+
  +--> | - image: robertdebock/github-action-molecule |
       +-+--------------------------------------------+
         |
         |    +--- github-action-molecule ---+
         +--> | - pip install molecule       |
              | - pip install tox            |
              +------------------------------+
1. Create a container
First create a container that has all tools installed you need and push it to Docker Hub. Here is the code for my container
2. Create an action
Create a GitHub repository per action. It should at least contain an action.yml. Have a look at the documentation for Actions.
3. Integrate your action
Pick a repository, and add a file (likely with the name of the action) in .gitlab/workflows/my_action.yml. The contents should refer to the action:
    steps:
      - name: checkout
        uses: actions/checkout@v2
        with:
          path: "$"
      - name: molecule
        uses: robertdebock/molecule-action@master
        with:
          image: $
A full example here.
The benefit is that you (or others) can reuse the action. Have fun making GitHub actions!
And, or and not
Today I spent a couple of hours on a condition that contained a mistake. Let me try to help myself and describe a few situations.
Condition?
A condition in Ansible can be described in a when statement. This is a simple example:
- name: do something only to virtual instances
  debug:
    msg: "Here is a message from a guest"
  when: ansible_virtualization_role == "guest"
And
It’s possible to describe multiple conditions. In Ansible, the when statement can be a string (see above) or a list:
- name: do something only to Red Hat virtual instances
  debug:
    msg: "Here is a message from a Red Hat guest"
  when:
    - ansible_virtualization_role == "guest"
    - ansible_os_family == "RedHat"
The above example will run when it’s both a virtual instance and it’s a Red Hat-like system.
Or
Instead of combining (‘and’) conditions, you can also allow multiple condition where either is true:
- name: do something to either Red Hat or virtual instances
  debug:
    msg: "Here is a message from a Red Hat system or a guest"
  when:
    - ansible_virtualization_role == "guest" or ansible_os_family == "RedHat"
I like to keep lines short to increase readability:
  when:
    - ansible_virtualization_role == "guest" or
      ansible_os_family == "RedHat"
And & or
You can also combine and and or:
- name: do something to a Debian or Red Hat, if it's a virtual instances
  debug:
    msg: "Here is a message from a Red Hat or Debian guest"
  when:
    - ansible_virtualization_role == "guest"
    - ansible_os_family == "RedHat" or ansible_os_family == "Debian"
In
It’s also possible to check if some pattern is in a list:
- name: make some list
  set_fact:
    allergies:
      - apples
      - bananas

- name: Test for allergies
  debug:
    msg: "A match was found: "
  when: item in allergies
  loop:
    - pears
    - milk
    - nuts
    - apples
You can have multiple lists and check multiple times:
- name: make some list
  set_fact:
    fruit:
      - apples
      - bananas
    dairy:
      - milk
      - eggs

- name: Test for allergies
  debug:
    msg: "A match was found: "
  when:
    - item in fruit or
      item in dairy
  loop:
    - pears
    - milk
    - nuts
    - apples
Negate
It’s also possible to have search in a list negatively. This is where it gets difficult: (for me!)
- name: make some list
  set_fact:
    fruit:
      - apples
      - bananas
    dairy:
      - milk
      - eggs

- name: Test for allergies
  debug:
    msg: "No match was found: "
  when:
    - item not in fruit
    - item not in dairy
  loop:
    - pears
    - milk
    - nuts
    - apples
The twist here is that both conditions (and) should not be true.
Well, I’ll certainly run into some issue again in the future, hope this helps you (and me) if you ever need a complex condition in Ansible.
Relations between containernames, setup and Galaxy
It’s not easy to find the relation between container names, facts returned from setup (or gather_facts) and Ansible Galaxy platform names.
Here is an attempt to make life a little easier:
Alpine
containername: alpine
ansible_os_family: Alpine
ansible_distribution: Alpine
galaxy_platform: Alpine
| galaxy_version |
docker_tag |
ansible_distribution_major_version |
| all |
latest |
3 |
| all |
edge |
3 |
AmazonLinux
containername: amazonlinux
ansible_os_family: RedHat
ansible_distribution: Amazon
galaxy_platform: Amazon
| galaxy_version |
docker_tag |
ansible_distribution_major_version |
| Candidate |
latest |
2 |
| 2018.03 |
1 |
2018 |
CentOS
containername: centos
ansible_os_family: RedHat
ansible_distribution: CentOS
galaxy_platform: EL
| galaxy_version |
docker_tag |
ansible_distribution_major_version |
| 8 |
latest |
8 |
| 7 |
7 |
7 |
RockyLinux
containername: rockylinux
ansible_os_family: RedHat
ansible_distribution: Rocky
galaxy_platform: EL
| galaxy_version |
docker_tag |
ansible_distribution_major_version |
| 8 |
latest |
8 |
Debian
containername: debian
ansible_os_family: Debian
ansible_distribution: Debian
galaxy_platform: Debian
| galaxy_version |
docker_tag |
ansible_distribution_major_version |
| bullseye |
latest |
11 |
| bookworm |
bookworm |
testing/12 |
Fedora
containername: fedora
ansible_os_family: RedHat
ansible_distribution: Fedora
galaxy_platform: Fedora
| galaxy_version |
docker_tag |
ansible_distribution_major_version |
| 32 |
32 |
32 |
| 33 |
latest |
33 |
| 34 |
rawhide |
34 |
OpenSUSE
containername: opensuse
ansible_os_family: Suse
ansible_distribution: OpenSUSE
galaxy_platform: opensuse
| galaxy_version |
docker_tag |
ansible_distribution_major_version |
| all |
latest |
15 |
Ubuntu
containername: ubuntu
ansible_os_family: Debian
ansible_distribution: Ubuntu
galaxy_platform: Ubuntu
| galaxy_version |
docker_tag |
ansible_distribution_major_version |
| focal |
latest |
20 |
| bionic |
bionic |
18 |
| xenial |
xenial |
16 |
Why would you write Ansible roles for multiple distributions?
I got some feedback in a discussion with the audience at DevOps Amsterdam.
My statement are:
- “Keep your code as simple as possible”
- “Write roles for multiple distributions” (To improve logic.)
These two contradict each other: simplicity would mean 1 role for 1 (only my) distribution.
Hm, that’s a very fair point. Still I think writing for multiple operating systems is a good thing, for these reasons:
- You get a better understanding of all the operating systems. For example Ubuntu is (nearly) identical to Debian, SUSE is very similar to Red Hat.
- By writing for multiple distributions, the logic (in
tasks/main.yml) becomes more stable.
- It’s just very useful to be able to switch distributions without switching roles.
Super important Ansible facts
There are some facts that I use very frequently, they are super important to me.
This is more a therapeutic post for me, than it’s a great read to you. ;-)
Sometimes, actually most of the times, each operating system or distribution needs something specific. For example Apache httpd has different package named for mostly every distribution. This mapping (distro:packagename) can be done using this variable: ansible_os_family.
Try to select packages/service-names/directories/files/etc based on the most general level and work your way down to more specific when required. This results in a sort of priority list:
- General variable, not related to a distribution. For example:
postfix_package.
ansible_os_family variable, related to the type of distribution, for example: httpd_package which differs for Alpine, Archlinux, Debian, Suse and RedHat. (But is’t the same for docker images debian and ubuntu.)ansible_distribution variable when each distribution has differences. For example: reboot_requirements. CentOS needs yum-utils, but Fedora needs dnf-utils.ansible_distribution and ansible_distribution_major_version when there are differences per distribution release. For example firewall_packages. CentOS 6 and CentOS 7 need to have a different package.
Here is a list of containers and their ansible_os_family.
| Container image |
ansible_os_family |
alpine |
Alpine |
archlinux/base |
Archlinux |
centos |
RedHat |
debian |
Debian |
fedora |
RedHat |
opensuse/leap |
Suse |
ubuntu |
Debian |
What I wish ansible collections would be
Ansible Collections is a way of:
- Packaging Ansible Content (modules/roles/playbooks).
- Distributing Ansible Content through Ansible Galaxy.
- Reducing the size of Ansible Engine.
All modules that are now in Ansible will move to Ansible Collections.
I’m not 100% sure how Ansible Collections will work in the future, but here is a guess.
From an Ansible role
I could imagine that requirements.yml will link depending modules and collections. Something like this:
---
- src: robertdebock.x
  type: role
- src: robertdebock.y
  type: collection
That structure would ensure that all modules required to run the role are going to be installed.
From an Ansible playbook repository
Identical to the role setup, I could imagine a requirements.yml that basically prepares the environment with all required dependencies, either roles or collections.
Loop dependencies
Ansible Collections can depend on other Ansible Collections.
Imagine my_collection’s requirements.yml:
---
- src: robertdebock.y
  type: collection
The Ansible Collection y could refer to my_colletion.
my_collection ---> y
       ^           |
       |           |
       +-----------+
I’m not sure how that can be resolved or prevented.
How many modules do you need?
Ansible Collections are coming. A big change in Ansible, so a stable version will likely be a good moment to go to Ansible 3. Listening to the developers, I think we can expect Ansible 3 in the spring of 2020.
Anyway, let’s get some stats:
How many modules am I using?
That was not so difficult to estimate: 97 modules.
What ‘weird’ modules?
A bit more difficult to answer, I’ve taken two approaches:
- Take the bottom of the list of “most used modules”.
- Walked through the 97 modules and discover odd once.
- bigip_*: I’ve written a role for a workshop.
- gem: Don’t know, weird.
- debug: What, get it out of there!
- include_vars: Why would that be?
- fail: Let’s check that later.
- set_fact: I’m now a big fan of
set_fact, most facts can be “rendered” in vars/main.yml.
How many ‘vendor’ modules?
I expect some Ansible Collections will be maintained by the vendors; Google (GCP), Microsoft (Azure), F5 (BigIP), yum (RedHat), etc. That’s why knowing this upfront is likely smart.
| Module |
Times used |
Potential maintainer |
| pip |
17 |
PyPi |
| apt |
16 |
Canonical |
| yum |
9 |
Red Hat |
| apt_key |
6 |
Canonical |
| apt_repository |
5 |
Canonical |
| rpm_key |
4 |
Red Hat |
| zypper |
3 |
SUSE |
| yum_repository |
3 |
Red Hat |
| dnf |
3 |
Red Hat/Fedora |
| zypper_repository |
2 |
SUSE |
| zabbix_host |
2 |
Zabbix |
| zabbix_group |
2 |
Zabbix |
| apk |
2 |
Alpine |
| tower_* |
7 (combined) |
RedHat |
| redhat_subscription |
1 |
RedHat |
| pacman |
1 |
ArchLinux |
| bigip_* |
6 (combined) |
F5 |
How often do I use what modules?
| Place |
Module |
Times used |
| 1 |
package |
138 |
| 2 |
service |
137 |
| 3 |
command |
73 |
| 4 |
template |
64 |
| 5 |
file |
62 |
| 6 |
meta |
27 |
| 7 |
assert |
26 |
| 8 |
unarchive |
24 |
| 9 |
lineinfile |
21 |
| 10 |
copy |
20 |
Wow, I’m especially surprised by two modules:
- command - I’m going to review if there are modules that I can use instead of
command. I know very well that command should be used as a last resort, not 73 times… Painful.
- assert - Most roles used to see of variable met the criteria. (If a variable is defined and the type is correct.) Rather wait for
role spec.
Ansible Fest Atlanta 2019
Announcements on Ansible, AWX, Molecule, Galaxy, Ansible-lint and many other produts are always done on Ansible Fest.
Here is what I picked up on Ansible Fest 2019 in Atlanta, Georgia.
Ansible Collections
Ansible if full of modules, “batteries included” is a common expression. This reduces velocity in adding modules, fixing issues with modules or adding features to modules. Ansible Collections is there to solve this issue.
Ansible will (in a couple of releases) only be the framework, without modules or plugins. Modules will have to be installed seprarately.
There are a few unknowns:
- How to manage dependencies between collections and Ansible. For example, what collections work on which Ansible version.
- The documentation of Ansible is very important, but how to keep the same central point of documentation while spreading all these collections.
- How to deal with colliding module names? Imaging the
file module is included in more than 1 collection, which one takes precedence?
Anyway, the big take-away: Start to learn to develop or use Ansible Collections, it’s going to be important.
Here is how to develop Ansible Collections and how to use them.
AWX
AWX is refactoring components to improve development velocity and the performance of the product itself.
- New UI, based on React and Pattern-Fly.
tower-cli will be replaced by awx, which exposed the availabe commands based on the capabilities of the AWX API. The version of awx will be the same as the AWX web/api-tool.
Data analysis
There are a few applications to analyse data and give insights on development and usage of Ansible:
There are many more perspectives, have a look.
Next Ansible Fest not in Europe
Spain seems to be the largest contributor of Ansible, but next Ansible Fest will be in San Diego.
The Contributors Summit will be in Europe though.
Why “hardening” is not a role
I see many developers writing an Ansible role for hardening. Although these roles can absolutely be useful, here is why I think there is a better way.
Roles are (not always, but frequently) product centric. Think of role names like:
A role for hardening you system has the potential to cover all kinds of topics that are covered in the product specific roles.
Besides that, in my opinion a role should be:
- Small
- Cover on function
A good indicator of a role that’s too big is having multiple task files in tasks.
So my suggestion to not use a harden role, but rather have each role that you compose a system out of, use secure defaults.
Ansible Molecule tests using Red Hat UBI images
Red Hat now offers Universal Base Images(UBI). These images are stored on Red Hat’s registry:
That’s great, now everybody can test on a Red Hat container.
There are a few hoops you have to jump through to be able to use it in Travis:
Store credentials in Travis
The Red Hat Registry documents that a username and password need to be set to be able to pull:
$ docker login registry.redhat.io
Username: ${REGISTRY-SERVICE-ACCOUNT-USERNAME}
Password: ${REGISTRY-SERVICE-ACCOUNT-PASSWORD}
Login Succeeded!

$ docker pull registry.redhat.io/ubi7/ubi
You need to generate a service-account once.
Paste the username and password in Travis, under the build -> more options -> settings - environment variables.
Be sure to escape weird characters. My username contains a |, for example: foo|bar needs to be entered as foo\|bar.
Change molecule.yml
Molecule can pickup environment variables as documented.
So, your molecule.yml may end up something like this:
(Reduced example, your milage may vary)
---
dependency:
  name: galaxy
  options:
    role-file: requirements.yml
driver:
  name: docker
platforms:
  - name: bootstrap-rhel-latest
    image: ubi8/ubi
    registry:
      url: registry.redhat.io
      credentials:
        username: $registryredhatiousername
        password: $registryredhatiopassword
scenario:
  name: default
Ansible Galaxy Collections are here!
As the documentation describes:
Collections are a new way to package and distribute Ansible related content.
I write a lot of roles, roles are nice, but it’s a bit like ingredients without a recipe: A role is only a part of the whole picture.
Collections allow you to package:
- roles
- actions
- filters
- lookup plugins
- modules
- strategies
So instead of [upstreaming](https://en.wikipedia.org/wiki/Upstream_(software_development) content to Ansible, you can publish or consume content yourself.
The whole process is documented and should not be difficult.
I’ve published my development_environment and only had to change these things:
1. Add galaxy.yml
namespace: "robertdebock"
name: "development_environment"
description: Install everything you need to develop Ansible roles.
version: "1.0.4"
readme: "README.md"
authors:
    - "Robert de Bock"
dependencies:
license:
    - "Apache-2.0"
tags:
    - development
    - molecule
    - ara
repository: "https://github.com/robertdebock/ansible-development-environment"
documentation: "https://github.com/robertdebock/ansible-development-environment/blob/master/README.md"
homepage: "https://robertdebock.nl"
issues: "https://github.com/robertdebock/ansible-development-environment/issues"
2. Enable Travis for the repository
Go to Travis and click Sync account. Wait a minute or so and enable the repository containing your collection.
3. Save a hidden variable in Travis
Under settings for a repository you can find Environment Variables. Add one, I called it galaxy_api_key. You’ll refer to this variable in .travis.yml later.
4. Add .travis.yml
---
language: python

install:
  - pip install mazer
  - release=$(mazer build | tail -n1 | awk '{print $NF}')

script:
  - mazer publish --api-key=${galaxy_api_key} ${release}
Bonus hint: Normally you don’t save roles, so you add something like roles/* to .gitignore, but in this case it is a part of the collection. So if you have requirements.yml, download all the roles locally using ansible-galaxy install -r roles/requirements.yml -f and include them in the commit.
Fedora 30 and above use python-3
Fedora 30 (and above) uses python 3 and start to deprecate python 2 package like python2-dnf.
Ansible 2.8 and above discover the python interpreter, but Ansible 2.7 and lower do not have this feature.
So for a while, you have to tell Ansible to use python 3. This can be done by setting the ansible_python_interpreter somewhere. Here are a few locations you could use:
1. inventory
This is quite a good location, because you could decide to give a single node this variable:
inventory/host_vars/my_host.yml:
---
ansible_python_interpreter: /usr/bin/python3
Or you could group hosts and apply a variable to it:
inventory/hosts:
inventory/group_vars/python3.yml
---
ansible_python_interpreter: /usr/bin/python3
You could start a playbook and set the ansible_python_interpreter once:
ansible-playbook my_playbook.yml --extra_vars "ansible_python_interpreter=/usr/bin/python3"
It’s not very persistent though.
3. playbook or role
You could save the variable in your playbook or role, but this makes re-using code more difficult; it will only work on machines with /usr/bin/python3:
---
- name: do something
  hosts: all

  vars:
    ansible_python_interpreter: /usr/bin/python3

  tasks:
    - name: do some task
      debug:
        msg: "Yes, it works."
4. molecule
Last case I can think of it to let Molecule set ansible_python_interpreter.
molecule/default/molecule.yml:
---
# Many parameters omitted.
provisioner:
  name: ansible
  inventory:
    group_vars:
      all:
        ansible_python_interpreter: /usr/bin/python3
# More parameters omitted.
Why you should use the Ansible set_fact module
So far it seems that the Ansible set_fact module is not required very often. I found 2 cases in the roles I write:
In the awx role:
- name: pick most recent tag
  set_fact:
    awx_version: ""
  with_items:
    - ""
In the zabbix_server role:
- name: find version of zabbix-server-mysql
  set_fact:
    zabbix_server_version: ""
In both cases a “complex” variable strucure is saved into a simpler to call variable name.
Variables that are constructed of other variables can be set in vars/main.yml. For example the kernel role needs a version of the kernel in defaults/main.yml:
And the rest can be calculated in vars/main.yml:
kernel_unarchive_src: https://cdn.kernel.org/pub/linux/kernel/v.x/linux-.tar.xz
So sometimes set_fact can be used to keep code simple, other (most) times vars/main.yml can help.
For a moral compass Southpark uses Brian Boitano, where my moral coding compass uses Jeff Geerling who would say something like: “If your code is complex, it’s probably not good.”
Different methods to include roles
There are several ways to include roles from playbooks or roles.
Classic
The classic way:
---
- name: Build a machine
  hosts: all

  roles:
    - robertdebock.bootstrap
    - robertdebock.java
    - robertdebock.tomcat
Or a variation that allows per-role variables:
---
- name: Build a machine
  hosts: all

  roles:
    - role: robertdebock.bootstrap
    - role: robertdebock.java
      vars: java_version: 9
    - role: robertdebock.tomcat
Include role
The include_role way:
---
- name: Build a machine
  hosts: all

  tasks:
    - name: include bootstrap
      include_role:
        name: robertdebock.bootstrap

    - name: include java
      include_role:
        name: robertdebock.java

    - name: include tomcat
      include_role:
        name: robertdebock.tomcat
Or a with_items (since Ansible 2.3) variation:
---
- name: Build a machine
  hosts: all

  tasks:
    - name: include role
      include_role:
        name: ""
      with_items:
        - robertdebock.bootstrap
        - robertdebock.java
        - robertdebock.tomcat
Sometimes it can be required to call one role from another role. I’d personally use import_role like this:
---
- name: do something
  debug:
    msg: "Some task"

- name: call another role
  import_role:
    name: role.name
If the role (role.name in this example) requires variables, you can set them in vars/main.yml, like so:
variable_x_for_role_name: foo
variable_y_for_role_name: bar
A real life example is my robertdebock.artifactory role calls robertdebock.service role to add a service.
The code for the artifactory role contains:
# snippet
- name: create artifactory service
  import_role:
    name: robertdebock.service
# endsnippet
and the variable are set in [vars/main.yml](https://github.com/robertdebock/ansible-role-artifactory/blob/master/vars/main.yml) contains:
service_list:
  - name: artifactory
    description: Start script for Artifactory
    start_command: "/bin/artifactory.sh start"
    stop_command: "/bin/artifactory.sh stop"
    type: forking
    status_pattern: artifactory
A big thanks to … many
My parents, sister and family have been on a holiday to Lanzarote, Spain during Christmas and new-year. 11 people in total, 6 adults, 5 children.
During this holiday our oldest got sick. It started as a fever but did not get better, even afer some 2 weeks.
Our oldest is an 8 year old boy, pretty strong and autonomous, no history of sicknesses.
We went to the doctor, he referred us to the hospital in Lanzarote, in Arrecife. He did not get better after receiving antibiotics for some 4 days.
A CT scan indicated his sinuses were infected an the infection broke through to his brains. A medical helicopter was called in to transport him to the hospital on another Canary island; Gran Canaria.
Surgery was performed and he was sent to the “high intensive care”. Quite impressive, but please realize what a horrible time this was for me and my wife.
It’s now 10 days after his surgery, he’s eating, speaking, moving and laughing again. We’ll probably spend this year recovering all of his functions, like walking, properly speaking, etc. I’m hopeful he’ll recover quickly and fully, but what a shock.
TL;DR: Son got sick, he’s doing well, time to code.
All the hospital days and nights gave me quite some time to write code. Because of crappy internet connections, It was a challenge to test code.
Here are the services I’ve used.
- Travis - What a great platform, you can test your code, free of charge. It’s flexible, fast, well documented and feature-rich. Really give it a go, can’t epxress how great this service is.
- GitHub - To store code and communicate with others. I’m not a big Microsoft fan, but GitHub is a great service. Please keep up the wonderful platform!
- DigitalOcean - Although not free, it’s so easy to spin up a machine. I’ve created and still work on an Ansible Development Environment, basically to save bandwidth.
I’m very thankful for all the medical staff in Spain, I’m impressed by the quality of the hospital services and staff.
Family, friends and colleagues have expressed their concerns, it does not help my son, but it did help me to know that people are thinking of us.
How to write and maintain many Ansible roles
It’s great to have many code nuggets around to help you setup an environment rapidly. Ansible roles are perfect to describe what you want to do on systems.
As soon as you start to write more roles, you start to develop a style and way of working. Here are the tings I’ve learned managing many roles.
Use a skeleton for stating a new role
When you start to write a new role, you can start with pre-populated code:
ansible-galaxy init --role-skeleton=ansible-role-skeleton role_name
To explain what happens:
ansible-galaxy is a command. This may change to molecule in the future.init tells ansible-galaxy to initialize a new role.--role-skeleton=ansible-role-skeleton refers to a skeleton ansible role. I use his repository.role_name is the name of your new role. I use short names here, like nginx or postfix.
Use ansible-lint for quick feedback
Andrew has written a tool including many rules that help you write readable and consistent code.
There are times where I don’t agree to the rules, but the feedback is quickly processed.A
There are also times where I initially think rules are useless, but after a while I’m convinced about the intent and change my code.
You can also describe your preferences and use ansible-lint to verify you code. Great for teams that need to agree on a style.
Use molecule on Travis to test
In my opinion the most important part of writing code is testing. I spend a lot of time on writing and executing tests. It helps yourself to prove that certain scenarios work as intended.
Travis can help test your software. A typical commit takes some 30 to 45 minutes to test, but after that I know:
- It works on the platforms I want to support.
- When it works, the software is released to Galaxy
- Pull requests are automatically tested.
It makes me less afraid of committing.
When I write some new functionality, I typically need a few iterations to make it work. Using GitHub releases helps me to capture (and release) a working version of a role.
You can play as much as you want in between releases, but when a release is done, the role should work.
Go forth and develop!
You can setup a machine yourself for developing Ansible roles. I’ve prepared a repository that may help.
The playbook in that repository looks something like this:
---
- name: setup an ansible development environment
  hosts: all
  become: yes
  gather_facts: no

  roles:
    - robertdebock.bootstrap
    - robertdebock.update
    - robertdebock.fail2ban
    - robertdebock.openssh
    - robertdebock.digitalocean_agent
    - robertdebock.common
    - robertdebock.users
    - robertdebock.postfix
    - robertdebock.docker
    - robertdebock.investigate
    - robertdebock.ansible
    - robertdebock.ansible_lint
    - robertdebock.buildtools
    - robertdebock.molecule
    - robertdebock.ara
    - robertdebock.ruby
    - robertdebock.travis

  tasks:
    - name: copy private key
      copy:
        src: id_rsa
        dest: /home/robertdb/.ssh/id_rsa
        mode: "0400"
        owner: robertdb
        group: robertdb

    - name: copy git configuration
      copy:
        src: gitconfig
        dest: /home/robertdb/.gitconfig

    - name: create repository_destination
      file:
        path: ""
        state: directory
        owner: robertdb
        group: robertdb

    - name: clone all roles
      git:
        repo: "/.git"
        dest: "/"
        accept_hostkey: yes
        key_file: /home/robertdb/.ssh/id_rsa
      with_items: ""
      become_user: robertdb
When is a role a role
Sometimes it’s not easy to see when Ansible code should be captured in an Ansible role, or when tasks can be used.
Here are some guidelines that help me decide when to choose for writing an Ansible role:
Don’t repeat yourself
When you start to see that your repeating blocks of code, it’s probably time to move those tasks into an Ansible role.
Repeating yourself may:
- Introduce more errors
- Be more difficult to maintain
Keep it simple
Over time Ansible roles tend to get more complex. Jeff Geerling tries to keep Ansible roles under 100 lines. That can be a challenge, but I agree to Jeff.
Whenever I open up somebody else’ Ansible role and the code keeps on scrolling, I tend to get demotivated:
- Where can you find the error/issue/bug?
- How can this be maintained?
- There is probaly no easy way to test this.
- The code does many things and misses focus.
Cleanup your playbook
Another reason to put code in Ansible roles, is to keep your playbook easy to read. A long list of tasks is harder to read than a list of roles.
Take a look at this example:
- name: build the backend server
  hosts: backend
  become: yes
  gather_facts: no

  roles:
    - robertdebock.bootstrap
    - robertdebock.update
    - robertdebock.common
    - robertdebock.python_pip
    - robertdebock.php
    - robertdebock.mysql
    - robertdebock.phpmyadmin
This code is simple to read, anybody could have an understanding what it does.
Some roles can have variables to change the installation, imagine this set of variables:
The role can assert variables, for example:
- name: test input
  assert:
    that:
      - httpd_port <= 65535
      - httpd_port >= 1
Check yourself
To verify that you’ve made the right decision:
Could you publish this role?
That means you did not put data in the role, except sane defaults.
Would anybody else be helped with your role?
That means you thought about the interface (defaults/main.yml).
Is there a simple way to test your role?
That means the role is focused and can do just a few things.
Was it easy to think of the title?
That means you knew what you were building.
Conclusion
Hope this helps you decide when a role is a role.
Testing CVE 2018-19788 with Ansible
So a very simple exploit on polkit has been found. There is not solution so far.
To test if your system is vulnerable, you can run this Ansible role.
A simple playbook that includes a few roles:
---
- name: test cve 2018 19788
  hosts: all
  gather_facts: no
  become: yes

  roles:
    - robertdebock.bootstrap
    - robertdebock.update
    - robertdebock.cve_2018_19788
And a piece of altered-for-readability code from the role:
- name: create a user
  user:
    name: cve_2018_19788
    uid: 2147483659

- name: execute a systemctl command as root
  service:
    name: chronyd
    state: started
In my tests these were the results: (snipped, only kept the interesting part)
TASK [ansible-role-cve_2018_19788 : test if user can manage service] ***********
    ok: [cve-2018-19788-debian] => {
        "changed": false,
        "msg": "All assertions passed"
    }
    fatal: [cve-2018-19788-ubuntu-16]: FAILED! => {
        "assertion": "not execute_user.changed",
        "changed": false,
        "evaluated_to": false,
        "msg": "users can manage services"
    }
    ...ignoring
    fatal: [cve-2018-19788-ubuntu-18]: FAILED! => {
        "assertion": "not execute_user.changed",
        "changed": false,
        "evaluated_to": false,
        "msg": "users can manage services"
    }
    ...ignoring
    fatal: [cve-2018-19788-ubuntu-17]: FAILED! => {
        "assertion": "not execute_user.changed",
        "changed": false,
        "evaluated_to": false,
        "msg": "users can manage services"
    }
    ...ignoring
    fatal: [cve-2018-19788-fedora]: FAILED! => {
        "assertion": "not execute_user.changed",
        "changed": false,
        "evaluated_to": false,
        "msg": "users can manage services"
    }
    ...ignoring
    fatal: [cve-2018-19788-centos-7]: FAILED! => {
        "assertion": "not execute_user.changed",
        "changed": false,
        "evaluated_to": false,
        "msg": "users can manage services"
    }
    ...ignoring
    ok: [cve-2018-19788-centos-6] => {
        "changed": false,
        "msg": "All assertions passed"
    }
So for now these distributions seem vulnerable, even after an update:
- Ubuntu 16
- Ubuntu 17
- Ubuntu 18
- Fedora 28
- Fedora 29
- CentOS 7
Ansible on Fedora 30.
Fedora 30 (currently under development as rawhide) does not have python2-dnf anymore.
The Ansible module dnf tries to install python2-dnf if it running on a python2 environment. It took me quite some time to figure out why this error appeared:
fatal: [bootstrap-fedora-rawhide]: FAILED! => {"attempts": 10, "changed": true, "msg": "non-zero return code", "rc": 1, "stderr": "Error: Unable to find a match\n", "stderr_lines": ["Error: Unable to find a match"], "stdout": "Last metadata expiration check: 0:01:33 ago on Thu Nov 29 20:16:32 2018.\nNo match for argument: python2-dnf\n", "stdout_lines": ["Last metadata expiration check: 0:01:33 ago on Thu Nov 29 20:16:32 2018.", "No match for argument: python2-dnf"]}
(I was not trying to install python2-dnf, so confusion…)
Hm; so I’ve tried these options to work around the problem:
- Use alternatives to set /usr/bin/python to /usr/bin/python3. Does not work, the Ansible module dnf will still try to install python2-dnf.
- Set
ansible_python_interpreter for Fedora-30 hosts. Does not work, my bootstrap role does not have any facts, it does not know about ansible_distribution (Fedora), nor ansible_distribution_major_version (30).
so far the only reasonable option is to set ansible_python_interpreter as documented by Ansible.
provisioner:
  name: ansible
  inventory:
    group_vars:
      all:
        ansible_python_interpreter: /usr/bin/python3
This means all roles that use distributions that:
- use dnf
- don’t have python2-dnf
will need to be modified… Quite a change.
2 December 2018 update: I’ve created pull request 49202 to fix issue 49362.
TL;DR On Fedora 30 (and higher) you have to set ansible_python_interpreter to /usr/bin/python3.
Ansible Molecule testing on EC2
Molecule is great to test Ansible roles, but testing locally with has it’s limitations:
- Docker - Not everything is possible in Docker, like starting services, rebooting of working with block devices.
- Vagrant - Nearly everything is possible, but it’s resource intensive, making testing slow.
I use my bus-ride time to develop Ansible Roles and the internet connection is limited, which means a lot of waiting. Using AWS EC2 would solve a lot of problems for me.
Here is how to add an EC2 scenario to an existing role.
Save AWS credentials
Edit ~/.aws/credentials using information downloaded from [AWS Console].
[default]
aws_access_key_id=ABC123
aws_secret_access_key=ABC123
On the node where you initiate the tests, a few extra pip modules are required.
Add a scenario
If you already have a role and want to add a single scenario:
cd ansible-role-your-role
molecule init scenario --driver-name ec2 --role-name ansible-role-your-role --scenario-name ec2
Start testing
And simply start testing in a certain region.
export EC2_REGION=eu-central-1
molecule test --scenario-name ec2
The molecule.yml should look something like this:
---
dependency:
  name: galaxy
driver:
  name: ec2
lint:
  name: yamllint
platforms:
  - name: rhel-7
    image: ami-c86c3f23
    instance_type: t2.micro
    vpc_subnet_id: subnet-0e688067
  - name: sles-15
    image: ami-0a1886cf45f944eb1
    instance_type: t2.micro
    vpc_subnet_id: subnet-0e688067
  - name: amazon-linux-2
    image: ami-02ea8f348fa28c108
    instance_type: t2.micro
    vpc_subnet_id: subnet-0e688067
provisioner:
  name: ansible
  lint:
    name: ansible-lint
scenario:
  name: ec2
Weirdness
It feels as if the ec2 driver has had a little less attention as for example the vagrant or docker driver. Here are some strange things:
- The region needs to be set using an environment variable, the credentials from a file. This may be my mistake, but now it’s a little strange. It would feel more logical to add
region: to the platform section.
- The
vpc_subnet_id should be found by the user and put into molecule.yml.
Molecule and ARA
To test playbooks, molecule is really great. And since Ansible Fest 2018 (Austin, Texas) clearly communicated that Molecule will be a part of Ansible, I guess it’s safe to say that retr0h’s tool will be here to stay.
When testing, it’s even nicer to have great reports. That’s where ARA comes in. ARA collects job output as a callback_plugin, saves it and is able to display it.
Here is how to set it up.
Install molecule
Install ara
Start ara
Edit molecule.yml, under provisioner:
provisioner:
  name: ansible
  config_options:
    defaults:
      callback_plugins: /usr/lib/python2.7/site-packages/ara/plugins/callbacks
Now point your browser to http://localhost:9191/ and run a molecule test:
[204] Lines should be no longer than 120 chars
It seems Galaxy is going to use galaxy-lint-rules to star roles.
One of the controls tests the length of the lines. Here are a few way so pass those rules.
Spread over lines
In YAML you can use multi line to spread long lines.
Without new lines
The > character replaces newlines by spaces.
- name: demostrate something
  debug:
    msg: >
      This will just
      be a single long
      line.
With new lines
The | character keeps newlines.
- name: demostrate something
  debug:
    msg: |
      The following lines
      will be spread over
      multiple lines.
Move long lines to vars
Sometimes variables can get very long. You can save a longer variable in a shorter one.
For example, too long would be this task in main.yml:
- name: unarchive zabbix schema
  command: gunzip /usr/share/doc/zabbix-server-{{ zabbix_server_type }}-{{ zabbix_version_major }}.{{ zabbix_version_minor }}/create.sql.gz
Copy-paste that command to vars/main.yml:
gunzip_command: "gunzip /usr/share/doc/zabbix-server-{{ zabbix_server_type }}-{{ zabbix_version_major }}.{{ zabbix_version_minor }}/create.sql.gz"
And change main.yml to simply:
- name: unarchive zabbix schema
  command: "{{ gunzip_command }}"
Conclusion
Yes it’s annoying to have a limitation like this, but it does make the code more readable and it’s not difficult to change your roles to get 5 stars.
Ansible roles for clusters
Ansible can be used to configure clusters. It’s actually quite easy!
Typically a cluster has some master/primary/active node, where stuff needs to be done and other stuff needs to be done on the rest of the nodes.
Ansible can use run_once: yes on a task, which “automatically” selects a primary node. Take this example:
inventory:
tasks/main.yml:
- name: do something on all nodes
  package:
    name: screen
    state: present

- name: select the master/primary/active node
  set_fact:
    master: ""
  run_once: yes

- name: do something to the master only
  command: id
  when:
    - inventory_hostname == master

- name: do something on the rest of the nodes
  command: id
  when:
    - inventory_hostname != master
It’s a simple and understandable solution. You can even tell Ansible that you would like to pin a master:
- name: select the master/primary/active node
  set_fact:
    master: ""
  run_once: yes
  when:
    - master is not defined
In the example above, if you set “master” somewhere, a user can choose to set a master instead of “random” selection.
Hope it helps you!
Ansible Galaxy Lint
Galaxy currently is a dumping place for Ansible roles, anybody can submit any quality role there and it’s kept indefinitely.
For example Nginx is listed 1122 times. Happily Jeff Geerling’s role shows up on top, probably because it has the most downloads.
The Galaxy team has decided that checking for quality is one way to improve search results. It looks liek roles will have a few criterea:
The rules are stored in galaxy-lint-roles. So far Andrew, House and Robert have contributed, feel free to propose new rules or improvements!
You can prepare your roles:
cd directory/to/save/the/rules
git clone https://github.com/ansible/galaxy-lint-rules.git
cd directory/to/your/role
ansible-lint -r directory/to/save/the/rules/galaxy-lint-rules/rules .
I’ve removed quite a few errors by using these rules:
- Missing spaces after {{ or before }}.
- Comparing booleans using
== yes.
- meta/main.yml mistakes
You can peek how your roles are scored on development.
Ansible 2.7
As announced, Ansible 2.7 is out. The changed look good, I’m testing my bootstrap role agains it.
In 2.7 (actually since 2.3) all package modules don’t need with_items: or loop: anymore. This make for simpler code.
- name: customize machine
  hosts: all

  vars:
    packages:
      - bash
      - screen
      - lsof

  tasks:
    - name: install packages
      package:
        name: "{{ packages }}"
        state: present
Wow, that’s simpler so better.
A reboot module has been introduced. Rebooting in Ansible is not easy, so this could make life much simpler.
AnsibleFest2018 (Austin, Texas)
So, it’s been such a good week! Dennis, Marco, Jonathan and I (and 1300 other Ansible fans) visited Ansible Fest 2018.
Good to meet you
After working with quite some people online, I was really happy to finally meet some Ansible heroes:
Highlights
Although nearly each talk was valuable, these are some (randomly ordered) takeaways that influence me:
- Jeff Geerling recommends to include -Purpose-, -Links- and -Test instructions- t each
README.md of a role.
- Mazer will be used to package role and send them off to Galaxy. It’s not production ready now though.
- Jeff Geerling recommends to
yamllint, --syntax-check and ansible-lint on earch commit, also molecule test and ansible-playbook --check will improve quality.
- Molecule will be much more integrated into the Ansible codebase.
- Jeff Geerling recomments to use the callback plugins
profile_roles, profile_tasks and timer, just as stdout_callback.
- Galaxy will work on GitLab (and likely any Git provider) integration.
- Galaxy will introduce code quality rating. Each role will be tested for Ansible Lint rules. Warnings and errors will reduce the amount of stars assigned. You can see this behaviour on the Development Galaxy for one of my roles.
- Jeff Geerling recommends to use “flat” variables. Consider these two examples:
Difficult to overwrite a single value:
apache:
  start_servers: 2
  max_clients: 2
Easy to overwrite:
apache_start_servers: 2
apache_max_clients: 2
All in all, I’m really happy with the direction Ansible is going and feel that most decicions I’ve done in the past year are correct.
I expect that molecule testing will be integrated into Galaxy and reports will be created using ARA will be integrated.